Hi all,
Fist time post, proud new owner of a white 91, L-300. I absolutely love it. I'm wanting to level the ride out a bit and am aware that cranking the torsion bars is possible to add about 1.5" to the front. Anybody done it. Any pointers on locating the adjustment bolt would be appreciated. I took off the skid plate and poked around tonight but was hesitant to start without being sure what I was looking for. Is is the same or similar to a Toyota Truck???
Oh....by the way I bought off Tony at VI Custom Car Imports in Errington vicustomcarimports.com, and he was really decent to deal with, and I would have no hesitation in recommending him, however next time I will import myself as I feel I now have a little better handle on it.
This forum is great.
Jeff
Torsion Bar Adjustment
Moderator: BCDelica
-
JD's Delica
- Posts: 5
- Joined: Mon Jul 24, 2006 9:31 pm
- Member's Photo Album: http://www.delica.ca/Photos/
- Location: Nanaimo
-
BCDelica

- Posts: 1808
- Joined: Tue Jul 18, 2006 4:12 pm
- Member's Photo Album: http://www.delica.ca/Photos/index.php?cat=10008
- Vehicle: WVO Powered Tuk Tuk
- Location: Central Van Isle
- Location: Somewhere with plenty of sun
Howdy Jeff,
Hope you guys had a good drive back from the west coast.
Adjusting the two nuts on each side is easy to do, but you change the toe-in (or camber, I don't know which) of the front wheels when you lift it, so a alignment is a must. My Toyota van had a similar set up, the adjuster are underneath, well up and under, behind the front seats at the forward area of the passenger compartment towards the sides. I gave my nuts a good shot of penetrating oil in case of breakage (couldn't help but type that and laugh - I just made this forum PG).
It makes a difference, we saw your van diving under braking and remembered that really decreased afterwards with ours. I sincerely say it's a must when you get a Delica, I have already informed the shop doing my inspection to do it.
Hey, Welcome aboard.
Cheers,
Kevin
 Call me BCDelica-less
-
lost1

- Posts: 81
- Joined: Fri Jul 21, 2006 9:33 am
- Member's Photo Album: http://www.delica.ca/Photos/
- Location: Matane, Quebec
very easy to do. DId it myself and had to get the wheels aligned afterwards, as they will wear out very quick. The ride is much improved
a question i have is ;
I was told to count the number of turns so that you adjust both sides equally, but the problem was when I measured the clearance btwn the fender flare and wheel center they werent equal. I compensated for this by cranking up one side more than the other. Is this bad
I was told there are many reasons for the left and right torsion bars to sag at different rates, but the difference was almost 2 inches.
I will probably give the Delica a 2 inch body lift (a throwback to my formative years as a redneck in Duncan BC) over the winter.
Lost1
-
BCDelica
- Posts: 1808
- Joined: Tue Jul 18, 2006 4:12 pm
- Member's Photo Album: http://www.delica.ca/Photos/index.php?cat=10008
- Vehicle: WVO Powered Tuk Tuk
- Location: Central Van Isle
- Location: Somewhere with plenty of sun
-
lost1
- Posts: 81
- Joined: Fri Jul 21, 2006 9:33 am
- Member's Photo Album: http://www.delica.ca/Photos/
- Location: Matane, Quebec
Yep, mine was low on drivers side. Probably from bashing curbs, fat drivers, roundabouts and a million other different reasons.
Ok here is a bit of info on my conversion to used veggie oil.
1) Welded up a 24 gallon stainless tank that replaces the spare tire in the back. Cost me 80 bucks for the stainless sheet that I needed (I had a bunch lying around as well). Still havent built my roof rack for the spare. I don't have a lift pump installed in the tank, but may put an inline pump if it becomes an option. The filler cap is inside the van, but ventilation is outside so no smelly inside car. I havent installed a fuel guage.
2) I dug up an old heat exchanger from an industrial refrigeration compressor ($15) at a wreckers in Duncan. It is a large spiral tube in tube configuration very much like the frybrid system. It would be perfect, but I discovered that the internal tube is copper (will need to change this). Anyway the antifreeze is diverted from the front heater unit into the heat exchanger and heats up the veggie oil inside the spiral.
The unit is tucked up inside the front bash guard, not visible to the naked eye.
3) I found that the 3 way garden hose valves (from Crappy TIre) ($8)make a good switch for the diesel/veggie oil coming in and out of the injector pump. I need to find gaskets that are resistant to diesel, the rubber ones get eaten in days...
I am trying to set the valves up with a bicycle cable and switch gear so that I can change from diesel to veg enroute. Totally manual, but I am a simple person.
4) I have 2 filters installed. first one is a Racor (from an ancient mercedes diesel, which is the same as the first generation diesel rabbit filters 12 microns) and a simple vw rabbit diesel filter (cant remember how many microns). 50 bucks for both filters
Other than miscellaneous hoses and clamps. connectors etc there really isnt much more to it than that
The veggie system is totally independant of the diesel, but could also function as a long range diesel tank when needed (I just need to put a bypass valve before the heat exchanger so that I don't heat the diesel fuel).
For filtering the oil I have a gravity system where one plastic 55 gallon barrel sits atop another barrel. The oil drains through a Pur type water filtration system (2x 10 inch filters). The veg oil is heated a bit with a hot water heater element so that it flows better. I will try and pump it through once I get a 12 volt fuel transfer pump
It took alot of time and creativity to do this as cheap as possible, I will continually improve the system as funds allow
Sorry I don't have any pictures because I am too busy to figure out how to post them. If you have any questions I can try my best to answer them.
-
BCDelica
- Posts: 1808
- Joined: Tue Jul 18, 2006 4:12 pm
- Member's Photo Album: http://www.delica.ca/Photos/index.php?cat=10008
- Vehicle: WVO Powered Tuk Tuk
- Location: Central Van Isle
- Location: Somewhere with plenty of sun
My new one is quite low on the driver's side too, this week I get it cranked up before I get my new right front tire. I need to lift the front today as this evening as a friend is selling his Jeep tires and rims, and I shouldn't, but we're going see if they'll fit. He wants $400 for one month old BFG Mudterrin's and nice alloy rims, and I dying to see how a 33" 10.5 tires will fit and look on the Delica. Well of course it'll look great, but I don't know if I'll need a bit of a lift and fender flares. If they fit at all I'll take a picture.
Great tank plan, I am planning to get one from the wrecks but need to strip the finish on the inside before installing it. Gotta figure out what to use for that? That's also a good idea for a heat exchanger, also it doesn't hurt to preheat diesel - supposedly it can improve fuel economy.
I picked up a http://www.duravalve.com/html/3VL2000.html at a garage sale, and plan to use it on my 3rd WVO vehicle (if that happens). I figure I could extend the shaft and push it through the fire wall. If I don't go down and dirty I'll install a http://www.greasecar.com/product_detail.cfm?prodID=10 , at $55 it seems about the cheapest electric valve. I bought a fuel gauge at Princess Auto, $5.95! They also had nifty adjustable tank floats for fuel levels - about $39 I think. Trust me, it's such a pain running out of fuel in a diesel.
That a great ingenious setup you got going Mike, very inspiring :D , it really ifits the spirit of going WVO - going green to save the green!
People are blown away that the restaurant even delivers my fuel right to my door, dropped off a couple feet away from my processing area just inside my garage.
Ciao
Kev
Call me BCDelica-less-
lost1
- Posts: 81
- Joined: Fri Jul 21, 2006 9:33 am
- Member's Photo Album: http://www.delica.ca/Photos/
- Location: Matane, Quebec
Hey Kev,
From what I understand, the jeep wheels won't work as the bolt holes don't line up. There is just a diff of a few mms. It may be possible to modify this, but getting it right could prove difficult. If the tires are greater than 235 75 (or 80) r15, then you will need to modify the arches, the front sidesteps and or lift the delica. Clearance for the sliding door could be an issue too.
I have been looking into lifting mine. There is a guy who did a 3 inch body lift and it looks fairly simple. Bit of welding, some blocks and replacing brake lines. The problem is that the delica get pretty complicated with its unibody and suspension set up. I think 3 inches may be a bit too high, but thats just me.
The beauty of the Crappy tire 3 way valves is that you can control the amount of opening on both the veg oil and diesel as there are 2 valves per unit. This means that I can actually 'premix' the veg and diesel inline. This can be quite interesting if the weather gets colder and the vegoil isn't going through so well. I haven't yet thought of a way to keep the premix from going back into the veg tank though...
THe link to the valve you sent me is brass. Any comments?
I want to put a fuel gauge in my tank, but I didnt quite build it to accomodate one. I am a bit fed up with cutting and welding, so I may just have to leave it for now.
I have to find some better sources for my vegoil. Lacking a bit in quantity, and delivery would be nice as getting the stuff is such a messy process...
cheers,
lost1
-
BCDelica
- Posts: 1808
- Joined: Tue Jul 18, 2006 4:12 pm
- Member's Photo Album: http://www.delica.ca/Photos/index.php?cat=10008
- Vehicle: WVO Powered Tuk Tuk
- Location: Central Van Isle
- Location: Somewhere with plenty of sun
Well your right about the rims not fitting, the center cut out is smaller though the bolt pattern seemed to fit. Of course I didn't get the rims bolted up at all, probably for the best. My new van has 31" tires and the arches are modified, also the original mud flaps have been changed. Still have to get the torsion bars tightened, waiting for a new tire first. I really was quite surprised, I excepted the 31*15 tires to rub and they clear with room to spare (Update - While I have to add I have since looked closer, and I can't see light betweem the flaps and the tires when turning sharp. But hey, they havn't touch yet). Running 33" tires with a lift would look cool, but I could survive without.
Are you going to install a tank heater of any kind, I don't know what this kind of sells for - http://www.arctic-fox.com/sitepages/pid74.php . We don't have to worry about it here. 8) That's a great idea about the 3 way valve, and I thought brass didn't react like copper? It seems that if the back flow has to go somewhere it's better off going into the WVO tank, you don't want to develop a diesel and WVO mix in the diesel tank when fall hits.
My suggestion for the veggie oil is to find a busy place that is a union shop, they will likely have two fryer's and change there oil every few days. A busy enough hotel with a pub and restaurant will more then enough to power one vehicle.
Last edited by BCDelica on Wed Sep 20, 2006 5:47 pm, edited 1 time in total.
Call me BCDelica-less-
ccautos
- Posts: 530
- Joined: Fri Sep 15, 2006 11:25 am
- Member's Photo Album: http://www.delica.ca/Photos/
- Vehicle: 92 Delica SE
- Location: Coombs , BC
- Contact:
I have a repair shop in Coombs and have now carried out several alignments on Delicas . Tha main problem with these vehicles coming in from Japan is that the suspension is set up to give a small pull to the right to counteract the road camber for driving on the left side of the road . These vehicle need to be reset to give a small pull to the left to counteract driving on the right side . It takes about two hours to re-align the front to drive straight and with some upgraded Monroe shocks they are a very pleasant vehicle to drive . In fact i might just buy one soon as I spend all day road testing them and then jump in my Dodge caravan which isn`t quite the same !!!!
torsion bar adjustments...
i was looking underneath my delica while the guys at midas were doing my oil change(i have to get it done by a shop if i don't want to void the warranty it came with...) and i quickly located the right hand side torsion bar, but heck for the life of me couldn't find the left one, it seems like the gas tank is right in the way, almost like you would have to take it off to get to it, can someone help, i would like to do the adjustment on it to, mine is considerably lower in the front than in the back, i think it needs to be cranked up a bit...
-
Mystery Machine
- Posts: 510
- Joined: Fri Dec 08, 2006 12:06 pm
- Location: Bristol (UK)
Re: torsion bar adjustments...
The passenger side (under the sliding door) IS there and can be adjusted without having to remove anything! It's just an absolute bu@%er to do compared to the drivers side!surferboy wrote:.....can someone help?
I have done a few without even jacking the vehicle up, just sliding under the motor and doing it with a ring spanner, but it's not much fun!
I have always done torsion bars with the full weight of the vehicle on them because this gives a truer reading than taking the weight off the torsion bar then having to wait for it to settle after a 5 mile drive! It also gives your arms a good work out! :lol:
If you follow the bar from behind the front wheel, you should be able to trace it back to the adjuster easily enough although I found it better to slide under from the drivers side and end up with my legs near the rear diff and head just past the transfer box.
If you are really stuck for space, maybe take the side step off first to give you more room from the passenger side. Whenever I have done it from this side, I've felt like I was going to puncture a lung on the bolts that stick down from the step! (not such a problem on the Mystery Machine now - I can literally sit up straight under it in certain spots!!
Get yourself a 17mm extra deep socket, cut it in half and weld an extension sleeve into the middle to make it longer than the torsion bar adjuster thread. I've done a quick sketch below to illustrate (hope it makes sense??
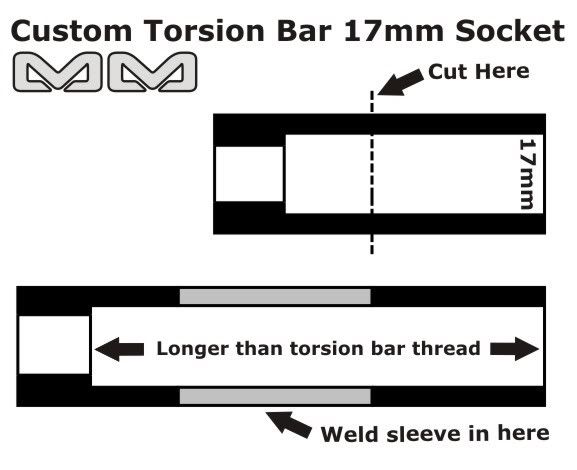
This will allow you to adjust the torsion bars MUCH more easily. You get better leverage, don't have to fumble around with 1/8th turns with a spanner, only to spend ages trying to locate the nut again! And it also saves a LOT of time!
Don't be tempted to use an air gun with the socket though, the heat build up could cause all sorts of problems like nuts seizing etc....and you don't get any 'feel' as the nut is tightened.
Always remember to tighten the lock nut too...
Once done, go for a 15-20 mile drive to let everything settle then check the ride height. Adjust accordingly until you have an even ride height.
If you raise it quite a bit, you might need to trim the upper bump-stops down, but this takes all of 5 mins with a hacksaw! Just unbolt and cut down by hand.
I hope this helps?
Any questions, please feel free to ask.... :D
Regards,
Bruce.
Last edited by Mystery Machine on Tue Feb 20, 2007 8:08 am, edited 1 time in total.
L300 Mystery Machine (High Altitude Edition  )
)
L300 MudMonkey ($400 bargain banger!! )
)
L300 MudMonkey ($400 bargain banger!!
-
josh
- Posts: 868
- Joined: Mon Jul 24, 2006 8:44 pm
- Member's Photo Album: http://www.delica.ca/Photos/
- Vehicle: L300 poptop gasser
- Location: Vancouver, bC
- Location: Vancouver, BC
-
jrman
- Posts: 506
- Joined: Thu Aug 16, 2007 12:29 pm
- Member's Photo Album: http://www.delica.ca/Photos/
- Vehicle: 1991 MMC Delica Exceed - Scoobus
Torsion Bar Adjustment
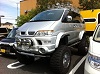
New shocks in the deli.
Cranked the torsion bars - found ratchetted closed end wrench from Canadian Tire ($14) was an awesome tool to get this done with. Very quick.
Trimmed out the fender well front and rear.
Put the 31" on - everything going well.....very happy.....then tried to open my sliding side door.....found out I don't have the extended sliding door hinges. I had read about it - but totally forgot to check clearances.
Fortunately it's still usable, but binds a bit and something I'd like to fix.
Exceedus Maximus is dirty - but had to post some pics...today was a GOOD day...
Does anyone know how I can get the extended hinges that are apparently on some vans that cross the pond?
Tks.
- Attachments
-
- Will clean later and get better daytime photos up
- Delica 004.jpg (39.17 KiB) Viewed 14390 times
-
- $14 at Canadian Tires, makes the cranking easier..not easy, just easier!
- Delica 002.jpg (40.43 KiB) Viewed 14390 times
Sean in North Van
1991 Delica Exceed - Scoobus
1991 Delica Exceed - Scoobus
-
Mystery Machine
- Posts: 510
- Joined: Fri Dec 08, 2006 12:06 pm
- Location: Bristol (UK)
Re: Torsion Bar Adjustment
I have one of these on the Mystery Machine. Took me quite some time to source one!jrman wrote:Does anyone know how I can get the extended hinges that are apparently on some vans that cross the pond?
Tks.
I am going to have to space the hinge on the Mud Monkey when I fit new wider rubber - but have an 'alternative' plan which I am pretty sure will work just fine for you (and is a lot cheaper, easier and no cutting of bodywork involved!)
Remove the interior panel along the back quarter (the panel where the rear speaker is covered). Once removed, you can access the mounting bolts for the sliding door runner.
Unbolt the runner and space it out with some washers: one or two near the door, three/four in the middle and five/six at the back. This will push the runner out a bit and give you clearance on the door when you open it.
A bit of an unusual one - but worth a try I reckon?
L300 Mystery Machine (High Altitude Edition )
L300 MudMonkey ($400 bargain banger!! )
L300 MudMonkey ($400 bargain banger!!
-
jrman
- Posts: 506
- Joined: Thu Aug 16, 2007 12:29 pm
- Member's Photo Album: http://www.delica.ca/Photos/
- Vehicle: 1991 MMC Delica Exceed - Scoobus
Re: Torsion Bar Adjustment
Hey Bruce,
That is exactly what I thought I would do. I spent some time pondering how the runner was attached, and of course - as is usual, ran out of time. I appreciate the heads up, I'm sure this will help is the way to go for me. I can open the door now about half way as it does get past the tire, but rubs up against it, so I think I only need a few mm she's good to run freely so spacing will probably do the trick. Will attack in a couple of weekends as off on holidays soon (away from my beloved Deli).
Tks again.
Sean in North Van
1991 Delica Exceed - Scoobus
1991 Delica Exceed - Scoobus