Page 1 of 2
1991 Battle Star Landram Projekt
Posted: Tue Apr 05, 2016 10:42 pm
by ynwa
Hi. This will hopefully be a long and fruitful thread that hopefully won't end in dispair, haha! I just picked up a 91 L300 Exceed TD that I knew had issues going in. Here's what I knew.
1. There was oil pretty much everywhere on the drivers side of the engine, front to back.
2. The power steering didn't work (fluid was leaking somewhere).
3. The cabin was gutted. Well the rear seats were pulled and a really bad .5" ply wat cobbled together and laid but thankfully, not adhered.
4. The tires were not that great.
5. Apparently it pulled pretty hard.
6. Sunroof was 'blocked' closed.
But it was a daily driver for a while. it started up great and ran. It was a little rough but it seemed that maintenance wasn't a big deal here. Seller paid 2,750 2 years ago, I picked it for 1k.
No smoke on the drive home with armstrong steering and a temperamental trans.
![20160327_150110[1].jpg](./download/file.php?id=19239)
- 20160327_150110[1].jpg (165.14 KiB) Viewed 19362 times
After getting it home I discovered additional items.
1. Right front signal doesn't work
2. Right rear tail light is out.
3. All wipers are pooched.
After much more reading, I started poking around in the engine bay again. Pulled the drivers seat and engine cover. Oh hey! What's this. Oh neat. There's another cover. Oh, hey! There's the power steering reservoir that was nowhere to be seen. Hmm, is that a missing intake pipe? hehe, nope. Nice and compact engine bay. Everything is easy (ish) to get to and looks easy to work on.

- Dig the funky access covers.
- 20160329_185759[1].jpg (102.16 KiB) Viewed 19362 times
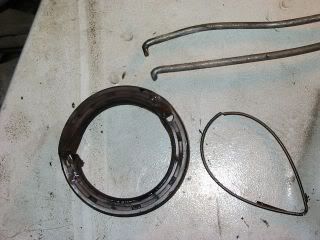
A full can of Citrus engine bright and some pressure washing, things start to look a little cleaner. A call into RMI for some filters and a Valve cover gasket. Have a few minutes free after work so I pull the upper timing cover off. Hmm, that doesn't look normal. Timing belt is in place and tight. But what's that belt there? And why can I see the teeth of the belt? *tug... Whoa! The balance belt has been bouncing around inside the cover for who the F knows how long. Thank the Norse Gods everything can still run.
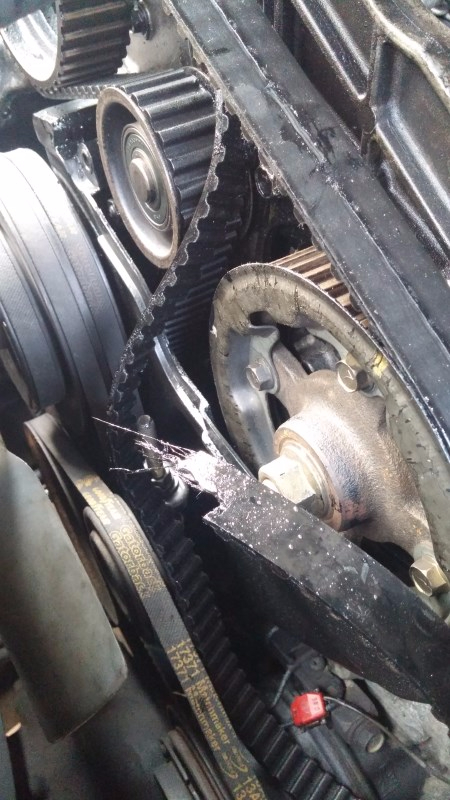
- Replaced 'near' the timing belt for effect, but it was just sitting in there, busted. :)
- 20160405_185245[1].jpg (324.79 KiB) Viewed 19362 times
Add balancer belt to the parts list.
So if there's anyone watching I have these q's.
Do you think the timing belt is hooped now that it's probably been slinging around with some oil for a little while? Or could I give it a nice soapy clean and dry everything with compressed air? They seem pretty hardy.
Looks like I'm probably adding all front seals to the mix as well. Joy.
Surely there is more to come. :)
Re: 1991 Battle Star Landram Projekt
Posted: Wed Apr 06, 2016 4:11 am
by Growlerbearnz
DEFINITELY replace the timing belt. Oil degrades the rubber, and washing it wont repair any damage. The cost of a new belt and tensioner pully is far less than the cost of a new head, and since youre in there already...
Good idea to replace the seals too. Youll need a front crankshaft seal and the two balance shaft seals. I would also do the water pump because it's there, but they dont actually give that much trouble. It's not a difficult job, but by the end of it you'll be revising your opinion on how easy the engine bay is to access.
Re: 1991 Battle Star Landram Projekt
Posted: Wed Apr 06, 2016 9:33 am
by ynwa
Growlerbearnz wrote:It's not a difficult job, but by the end of it you'll be revising your opinion on how easy the engine bay is to access.
Hehe, I'll learn to regret that statement! Thanks for the feedback. Looking forward to a long and arduous thread. :)
Re: 1991 Battle Star Landram Projekt
Posted: Sun Apr 10, 2016 10:35 pm
by ynwa
Today was full of tear down. I grabbed a healthy armful of parts from RMI (nice to have them in the neighborhood). I have the following:
> Timing Belt + tensioner
> Balancer Belt + tensioner
> 4 seals
> Water pump and Thermostat
> Rocker cover seal
> Fuel, Air, Oil filter
Pulled out the rad and noticed something funny about the fan bolts.
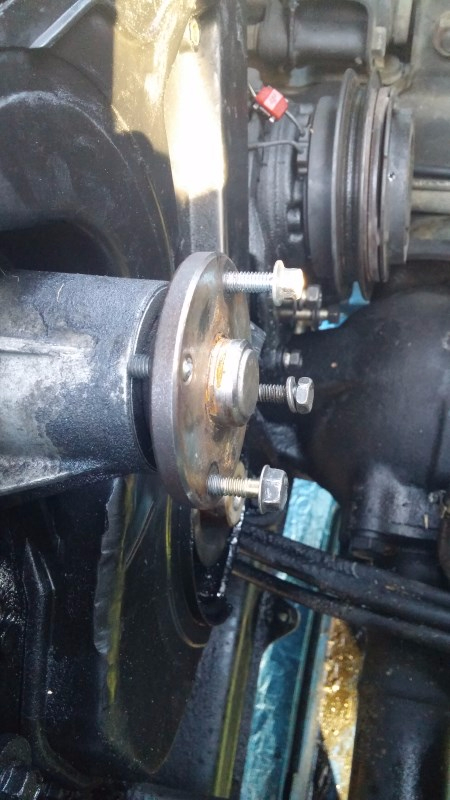
- Yep! Each bolt hole housed a completely unique item. 3 TOTALLY DIFFERENT BOLTS + one Sheared Bolt...
- 20160410_171022.jpg (279.21 KiB) Viewed 19320 times
That is a genuine *FacePalm... Now I'm proper worried.
Using the legendary 'bump' method found in this forum (Tojo = Legend), I was able to crack the bolt loose. Ingenious, yet nerve wracking. :)
- Worked like a charm after a few bumps!
- 20160410_162708_HDR.jpg (281.86 KiB) Viewed 19320 times
And this is how I left it today. I wish there were more hours in the day but after a 3hr trail run/trek and more espresso, there aren't many hours left.
- Lots of cleaning to do once the pulleys are off...
- 20160410_180148.jpg (329.93 KiB) Viewed 19320 times
Today's questions:
The inner crank pully isn't coming off that easily. Puller isn't quite working. Any quick and dirty tricks out there?
How would people advise that I crack the cam + pump pulley's (in order to get at the seals) without backing it up out of TDC too far? I recall that impact guns place too much 'end hammer' and could damage bearings. Agree? Disagree? Maybe grab the pully with the old belt braced against the direction of the breaker. *shrug.
Re: 1991 Battle Star Landram Projekt
Posted: Mon Apr 11, 2016 3:37 pm
by Growlerbearnz
The inner crank pulley (balance belt sprocket) is a pain- from memory it spans the two woodruff keys, and seems to accumulate a lot of gunk. I don't know of any tricks, but I think I had to grind the fingers on my puller to fit that pulley better.
You said "four seals"- I suspect you don't have the seal for the injection pump (Four would be crank, two balance shafts, cam). I'd avoid changing the injection pump seal unless it's leaking, but if you do then *don't* turn the pump backwards (apparently bad things happen) and *don't* hammer on the pump shaft. You're right, impact guns are evil. Use a puller.
Locking the camshaft... the bolt isn't (shouldn't be) all that tight. I have vague memories of trying to hold it still by putting a screwdriver through it and bracing on one of the ribs in the alloy casting behind. Avoid bracing on the triangular timing mark, they snap off easily. You could also try wrapping the old timing belt around the pulley and clamp it with vise-grips.
You've got the workshop manual so you know about how to lock the balance shafts, right?
Re: 1991 Battle Star Landram Projekt
Posted: Mon Apr 11, 2016 9:32 pm
by ynwa
Cheers! Managed to wiggle the belt 2 pulley off the crank using an l-shaped pry-bar and ever so slightly rocking it side to side... Manual says the cam sprocket should only be like 51ft lbs. Seems a tad tighter than that. Unsuccessful this evening.
Looking forward to the cleaning up and putting back together part... And finding those elusive balancer shaft lockout holes.
Re: 1991 Battle Star Landram Projekt
Posted: Thu Apr 14, 2016 10:28 pm
by ynwa
A little more movement today. Here's the successful layout in order to move the Crank Pulley bolt which was pretty darn tight! Seal was definitely spewing as there was still a little pool sitting near the bottom of the seal. I'm really looking forward until I can start putting this all back together.
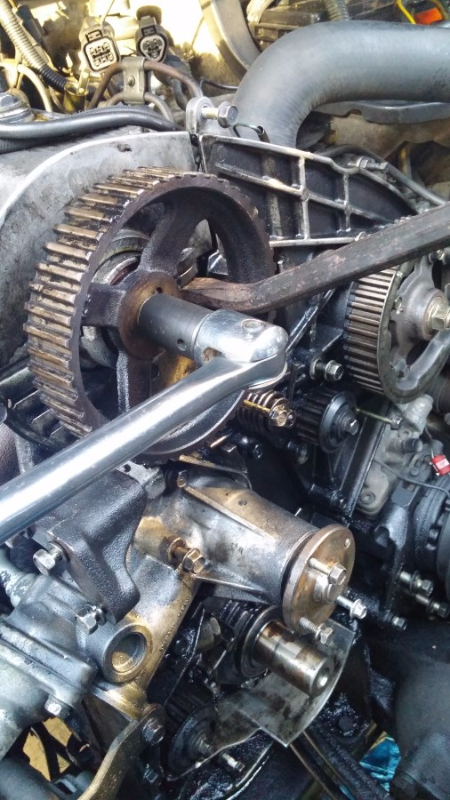
- Flat pry braced against some webbing with a breaker on the other side. Persuaded the bolt to move.
- 20160414_181944.jpg (415.86 KiB) Viewed 19281 times
This was by far the most 'fiddly' bit as you all know and as I have just learned. There was plenty of oil around so I decided to pull the alt.
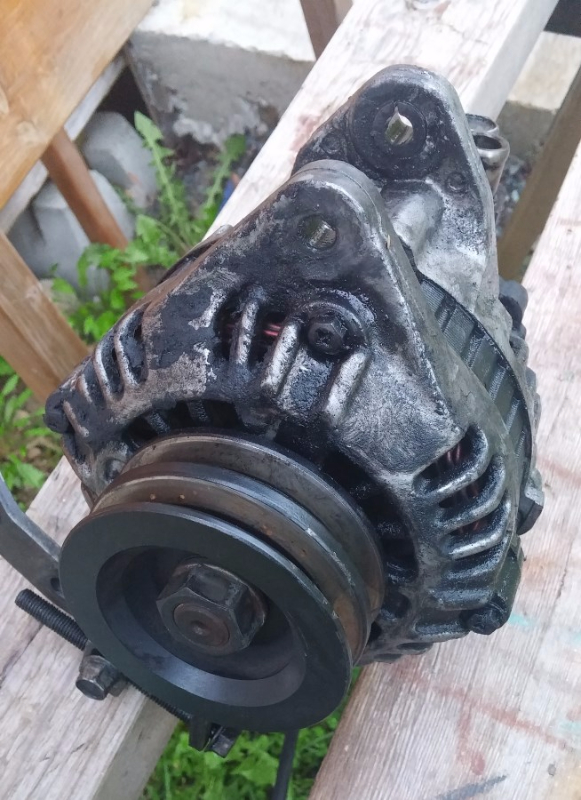
- This thing needs a good cleaning, but overall looks in pretty good shape, if not relatively recent.
- 20160414_194248.jpg (437.88 KiB) Viewed 19281 times
I sure wondered what that thing was on the back. From the hundreds of posts I've read it seems to be a vacuum pump? And why is there a 1" friggin oil tube leading into the oil pan? Geez... I've still not read anything that great that describes the function of this thing and all of its ins and outs.
Just need to pull the balance shaft pulleys, and waterpump.
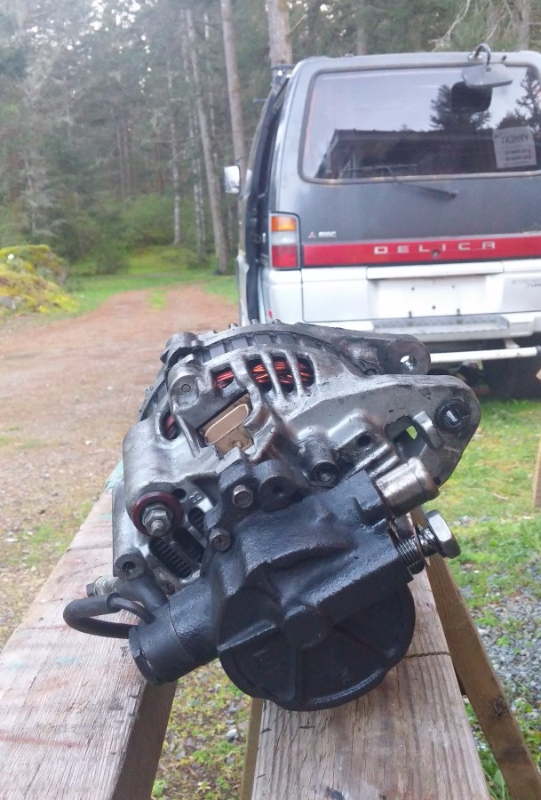
- The vacuum oil pumpy thing. :)
- 20160414_194332.jpg (434.71 KiB) Viewed 19281 times
Couldn't really pick out where the plugs are to 'lock' the balance shafts. I'll take a closer look this weekend when I start re-assembly. Oh, I read somewhere that we can re-use these copper washers around the banjo but it would be a good idea to 'anneal' them? hehe... Maybe just new.
Re: 1991 Battle Star Landram Projekt
Posted: Sat Apr 16, 2016 5:48 pm
by Growlerbearnz
On a gas engine the brake booster is driven by engine vacuum, but diesels don't make engine vacuum so they have a separate vacuum pump. The location varies on different engines- some are separate like a power steering pump, some are electric, Mitsubishi tend to put it on the back of the alternator. It has an oil feed to keep it lubricated and help sealing, and the big pipe is just to let the oil drain back into the sump. They're fairly reliable, but sometimes the seal on the input shaft fails and your alternator starts dripping oil.
Copper sealing rings are definitely reusable- they harden with age and use, but annealing them softens them again. Just heat them until they're glowing dark red, leave them to cool slowly (away from moving air etc), then gently clean off the oxidation with a wire brush.
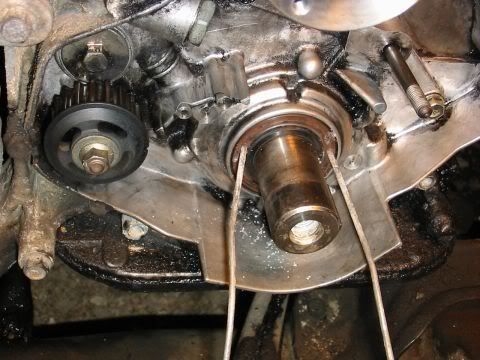
Balance shaft locking points are easy- anywhere through the steel cover on the injector pump side, and the locking plug on the other side.
- ShaftLock.JPG (33.82 KiB) Viewed 19261 times
- BalanceCover.JPG (28.9 KiB) Viewed 19261 times
Re: 1991 Battle Star Landram Projekt
Posted: Sat Apr 16, 2016 10:13 pm
by ynwa
Cheers Growler! That is like the most understated entry in the manual "ya, just remove the cover and stuff in a socket extension". Oh, ya you need a child's sized arm or ability to contort your hand, or remove the started to get at that bloody upper balance shaft. Somehow I managed. Sure was nice to hear that last pully bolt crack loose.
Pulled out the little parts washer and have started the cleanup. Blast a can of brake clean on the timing case to wash off the oil, blow it clean with compressed air and start on the seals.
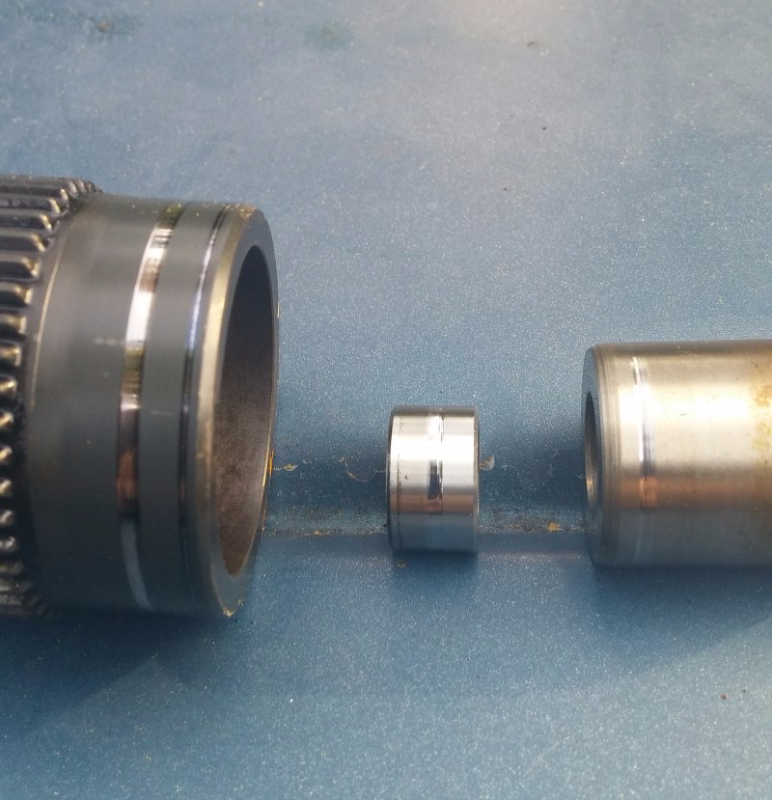
Incidentally, the bushing on the upper balance shaft 'was' expectedly shiny on the seal mating surface but my finger nail couldn't detect any ridge. I think I'll just pop it back in unless there is a shower of concern. :) Not sure if RMI has a fresh one or if it will stall my progress too much. Happy to hear feedback on that.
Re: 1991 Battle Star Landram Projekt
Posted: Sat Apr 16, 2016 11:26 pm
by motorang
Hi ynwa.
I am in on that one

Went down that road 9 years ago and made a (German) web page up to keep things fresh, so there may be one or the other picture to compare things here:
http://www.motorang.com/L300/L300_riemen.htm
As this page is referenced often as a tech guide, I would like to put some of your pictures in there, to explain things I did not photograph back then, would that be allright?
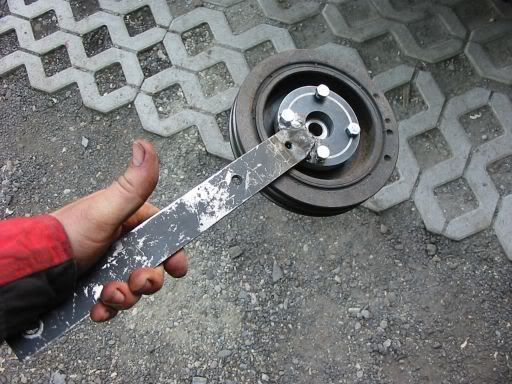
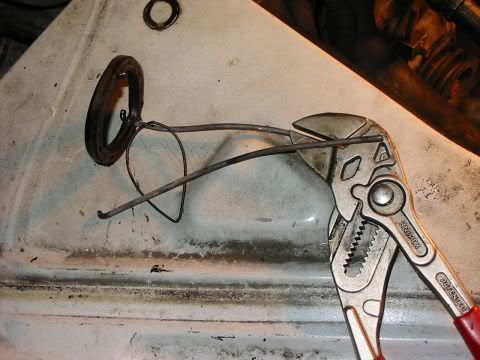
I posted a picture there for a pulley retainer, and how I got out the seals:
This comes handy for tighthening that nut with the correct torque:
For the seal I used wire hooks (from old welding sticks):
Andy
Re: 1991 Battle Star Landram Projekt
Posted: Sun Apr 17, 2016 12:20 am
by Growlerbearnz
Upper balance shaft sealing surface: mine was worn, and I should have bought a new one, but I cheated and installed the old one backwards. You lose the chamfered edge which is supposed to protect the seal, but I just wrapped the sharp edge with PVC electrical tape and used oil when installing the seal. It hasn't leaked yet...
Re: 1991 Battle Star Landram Projekt
Posted: Sun Apr 17, 2016 9:47 pm
by ynwa
Hi Motorang; please feel free! I'm honored to have my exploded balance belt featured, haha. I wish I'd taken a photo the moment I noticed. That was a bit of a prop, but I am Soooo thankful it just hung out in there while the bus drove for who knows how many more KM's.
Thanks, Growler, always appreciate your feedback.
Correct me if I'm wrong but I think I might be looking at a relatively new head in here? I'm accustomed to baked on oil on the valve springs and keepers. These are clean and crisp...
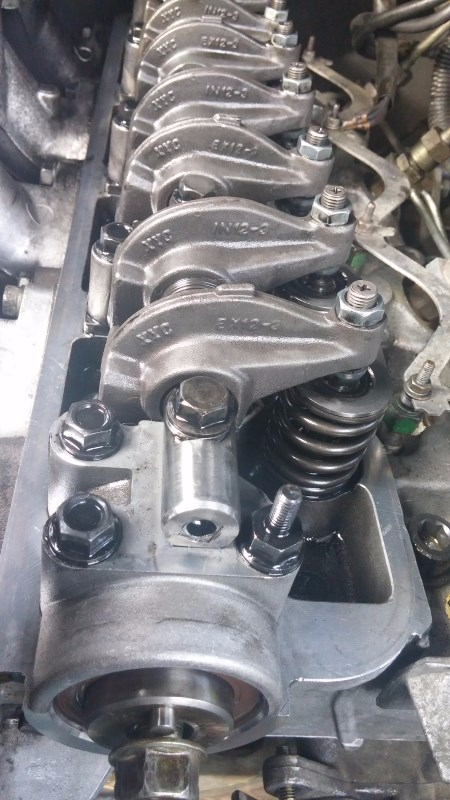
- Recent head?
- 20160417_165342.jpg (302.57 KiB) Viewed 19220 times
I think I'm just going to go ahead and replace them all. I think that the PO did not maintain this bus all that well so best to go with new (as I can afford)...
- I think Ill just go ahead and replace them all...
- 20160417_175642.jpg (427.65 KiB) Viewed 19220 times
This I's something I could use a few words on. To me, this looks like corrosion from water or moisture of some kind. Is this normal? Could this be caused by just sitting? That far into the crank shaft?
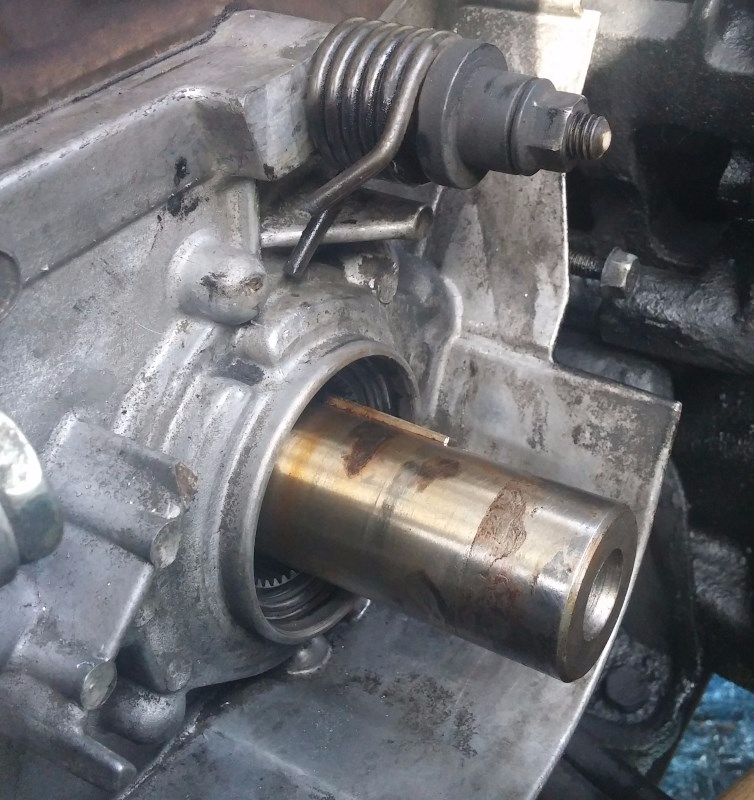
- Corrosion?
- 20160417_165403.jpg (415.61 KiB) Viewed 19220 times
Hoping for some happy shopping tomorrow.
Re: 1991 Battle Star Landram Projekt
Posted: Mon Apr 18, 2016 4:20 am
by Growlerbearnz
Oh, that is totally a new head. XYC brand rockers are the clincher, but there's no way something that pretty is the same age as the rest of your engine.

It's safest to replace the sealing surfaces, if you have time to wait for new ones. Those look a little too worn for my liking anyway.
That crankshaft is surgically clean compared to some! Give it a clean with a scotch pad or similar and you'll be fine. Consider buying a new retaining bolt, washer, and woodruff keys if the budget allows.
Re: 1991 Battle Star Landram Projekt
Posted: Wed Apr 20, 2016 11:06 pm
by Growlerbearnz
I've just had to replace my water pump (grr) and took a couple of photos that might help you when reassembling-
- FlywheelLock.jpg (43.17 KiB) Viewed 19194 times
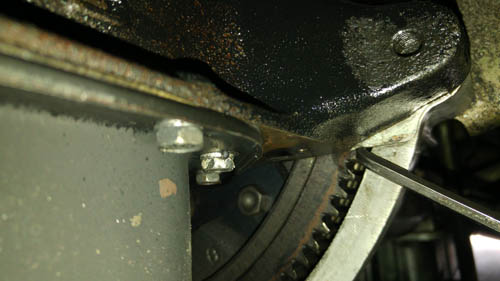
Locking the flywheel: if you remove the sheet metal cover between the bellhousing and the sump (four 10mm bolts), you can use an allen key to lock the flywheel. it fits nicely between two starter ring gear teeth and jams up against the bellhousing. This photo is of the left side for undoing the crank pulley bolt- for tightening you'd obviously put the allen key on the right side.

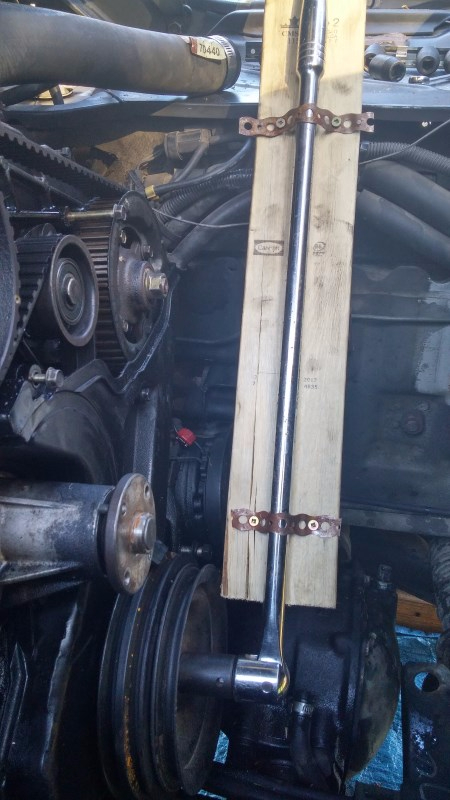
- TorqueBar.JPG (335.26 KiB) Viewed 19194 times
My torque wrench doesn't go to 180Nm, so I've attached an old socket to my breaker bar. It's the same distance from the breaker bar's end as the torque wrench is long, so it effectively doubles the torque wrench's length- which doubles the torque wrench's torque. So to get 180Nm at the bolt you'd set the torque wrench to 90Nm. Like so:
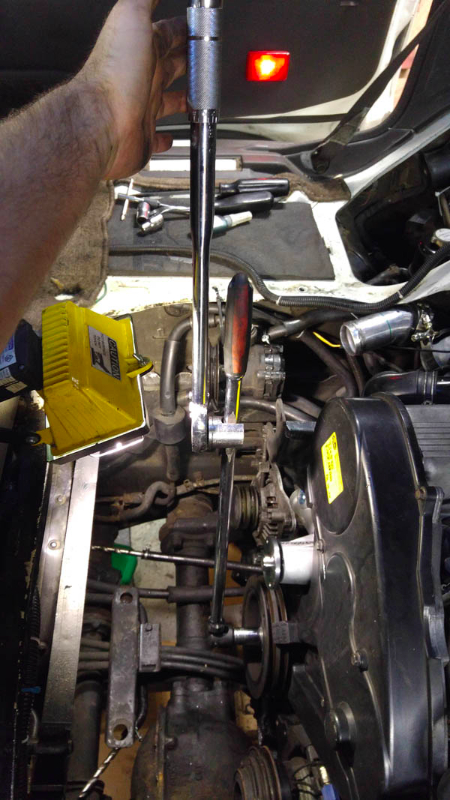
- InUse.jpg (430.56 KiB) Viewed 19194 times
Re: 1991 Battle Star Landram Projekt
Posted: Thu May 05, 2016 9:47 pm
by ynwa
Thanks again dude for all your tips. I'm still at it. Had a layoff running a few races including my first 50 mile trail run. :)
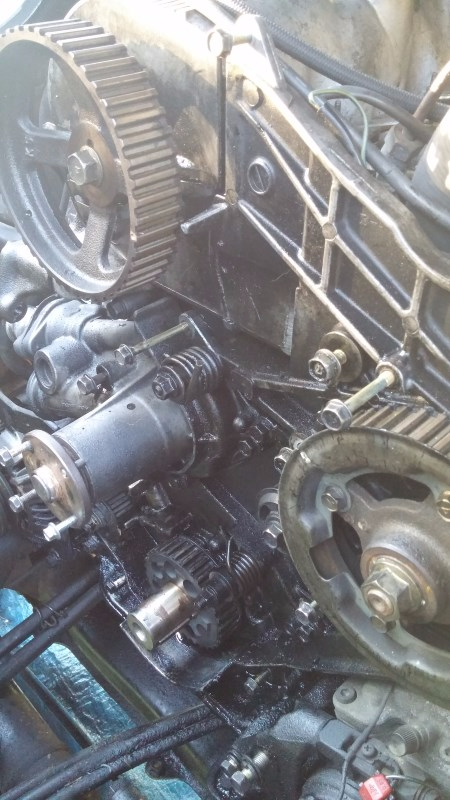
Anyway, I'm in the assembly stage. Here's a pretty shot of things a little cleaner than they used to be.
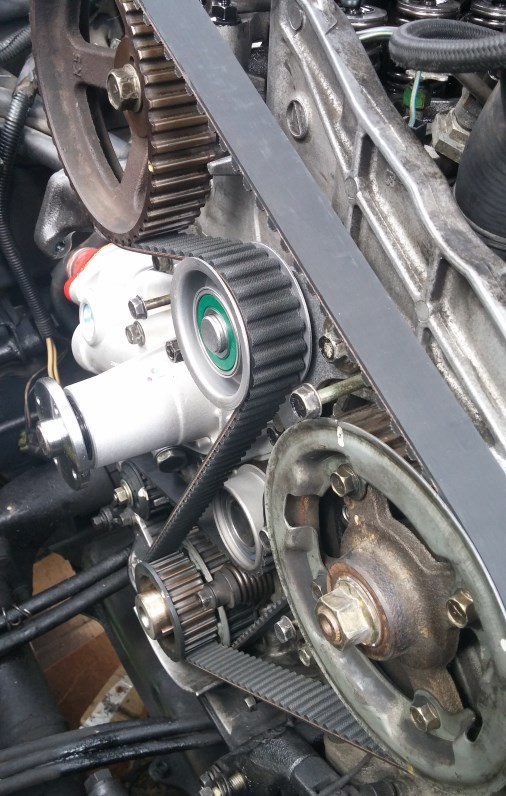
- 20160424_123857.jpg (119.42 KiB) Viewed 19136 times
Timing belt is on as you can see, marks stick around after multiple rotations; YAY! hehe.
However the silence shaft pulleys have managed to wiggle themselves a little out of sync. Oh well, easy fix. I posted this shot just for fun, nobody's perfect.
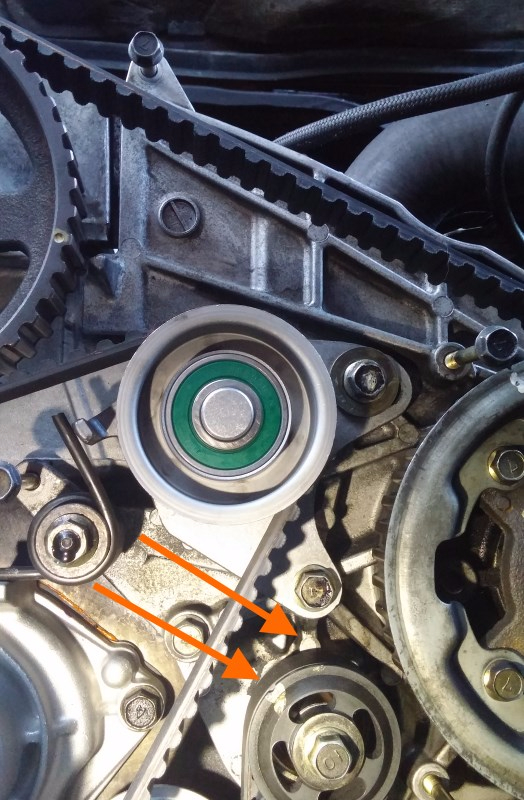
- Ooops! Haha...
- 20160505_192254.jpg (408.89 KiB) Viewed 19136 times
Since then I've set the rocker lash and fitted the cover with new gasket, half moon and bolt gaskets. I dropped a line of Copper on the halfmoon and a small dab at the corners of the cam half circle. The rest I left un-cocked... er.. caulked..
This weekend should see a real push towards the finish. I'll have a bunch of little picture/questions shortly. For instance, the PO installed a toggle to the AC pump for some reason that I'll likely find when I try to run it. It'll be fun finding all these little quirks.