Roof Rust - Mythbuster
-
Green1
- Posts: 3257
- Joined: Wed Jul 19, 2006 9:18 pm
- Member's Photo Album: http://www.delica.ca/Photos/
- Vehicle: 1994 L400 Royal Exceed PF8W
- Location: Calgary Alberta Canada
- Contact:
Re: Roof Rust - Mythbuster
the only rust spot I have that is at all worrysome is beside the front sunroof, I would like to check it from the bottom as well as it is bubbled pretty badly, but I have tried and tried and I just can not figure out how to get that front headliner out!
-
JMK
- Posts: 777
- Joined: Thu Sep 20, 2007 8:42 pm
- Vehicle: 92 Chamonix
- Location: Rocky Mountains, Alberta, Canada
Re: Roof Rust - Mythbuster
I'd also like to get under it at the front to install amber clearance lights but every time I remove something it seems a brittle piece of plastic like a retainer tab breaks, so I haven't even attempted that job yet. I solved the problem on the rear by putting the clearance lights on the back of the roof basket instead of the body itself.
Re: Roof Rust - Mythbuster
That was one of my two big ones. You pretty much have to take the whole roof down to get at it. Not worth the hastle of broken bits etc. There are a lot of pieces in that roof. Do a good repair from the outside. If it's a big bubble there is a good sized hole under it. Water will be leaking through and will eventually show up as water stain on the headliner.Green1 wrote:the only rust spot I have that is at all worrysome is beside the front sunroof, I would like to check it from the bottom as well as it is bubbled pretty badly, but I have tried and tried and I just can not figure out how to get that front headliner out!
I sandblasted them all today. That one had a good sized hole right through, you could see the cross member below through the hole. On the advice of my autobody friend I blasted them all out and slightly over filled with long strand fiberglass filler. He says it will outlast the van. I sanded the fiberglass down carefully with 120 and touched up with fine spot filler. Will sand the fine coat with 220 then prime and sand with 600, then paint and clear coat. It will look just like original and last for many years.
Bob
-
delicat

- Posts: 2331
- Joined: Thu Jul 26, 2007 6:26 pm
- Member's Photo Album: http://www.delica.ca/Photos/
- Vehicle: '92 Exeed '93 Safari '94 Pajero
- Location: New Westminster, BC
- Location: New Westminster, BC
Re: Roof Rust - Mythbuster
I'D be curious to know James' project for gutting the inside of his van... What's coming up?!? 
'93 Nissan Patrol
'94 Mitsubishi Pajero
"If it ain't broken, modify it!"
'94 Mitsubishi Pajero
"If it ain't broken, modify it!"
Re: Roof Rust - Mythbuster
Some more pics from today.
I previously posted pics of the bubbles, here are more detailed ones.
bubbles.jpg shows the 3 in a row bubbles and the two larger ones better in context of their location.
bubble 1.jpg and bubble 2.jpg show the two larger ones after sandblasting.
pinhole.jpg shows one of the 3 in a row bubbles after sandblasting.
I sandblasted all the bubbles today. Most had pinholes through the metal. A few didn't.
I then filled with long strand fiberglass filler, sanded and smoothed out with fine spot putty.
I'll take more pics tomorrow after sanding the fine filler and before painting.
I've decide to just repaint the roof the original colour for now and clearcoat.
Some points of interest while sandblasting. The blue paint on the roof is very thin. There is a much thicker coat of a gray primer beneath it. The rust was creeping beneath the primer on the surface of the metal beyond where any of the smaller bubbles at the edges are.
As can be seen in the pictures the rust was growing and spreading on the surface of the roof beneath the paint. Seems it may well have started where the pinhole is, but it's growing and spreading on the outside. I would definitely say it has started where the spot welds let go, apart from the few that had no hole. It would appear that it is not spreading the same way inside. Hopefully this has to do with the type of coating on the inside as they are not concerned with the finish under there, just corrosion protection. Good for us.
Seems they expected the paint finish to protect the outside.
- Bubble 1.jpg (39.41 KiB) Viewed 8841 times
- Bubble 1.jpg (39.41 KiB) Viewed 8841 times
- Bubbles.JPG (32.95 KiB) Viewed 8841 times
- pinhole.jpg (33.95 KiB) Viewed 8840 times
- pinhole.jpg (33.95 KiB) Viewed 8840 times
- Attachments
-
- Bubble 2.jpg (40.58 KiB) Viewed 8838 times
-
Green1
- Posts: 3257
- Joined: Wed Jul 19, 2006 9:18 pm
- Member's Photo Album: http://www.delica.ca/Photos/
- Vehicle: 1994 L400 Royal Exceed PF8W
- Location: Calgary Alberta Canada
- Contact:
Re: Roof Rust - Mythbuster
now I'm no expert in rust by any means, but if you only get rid of the rust on the outside, and it has actually gone all the way through, do you not risk having the rust re-appear all around your patch later? (I know I had a professionally done patch on my previous vehicle that had exactly that happen to it)
I'd be much more comfortable getting at the bottom too to be sure that I've gotten all the rust on both sides of the metal.
I'd be much more comfortable getting at the bottom too to be sure that I've gotten all the rust on both sides of the metal.
-
docsavage
- Posts: 406
- Joined: Sat Jul 22, 2006 2:48 pm
- Member's Photo Album: http://www.delica.ca/Photos/
- Vehicle: Deliless...
- Location: Prince Rupert
- Location: Prince Rupert
Re: Roof Rust - Mythbuster
Delicat,
That is my wrecked van, so I am stripping parts that are useful and hauling the rest to the dump in pieces. One of these days I'll get the plasma cutter fired up and start to get serious about taking it down. I does look bad in my driveway, but this is Houston so who cares!!!
I am looking at getting back into the Delica world. I am searching for a gas powered Delica in the right price range. I should know on one fairly soon. I am going to gas because I want more power to tow my boat and up here, a gas engine is more palatable to mechanics (except heavy duty diesel guys). I don't think the fuel economy will be any worse that that poor little diesel moving the brick around. So hopefully by next springs meets I'll have a tire smoking gas powered 150 + hp Delica.
James
PS. I didn't get to pics last night, will try again tonight.
James
1989 Delica P24W Exceed
Panasonic CQ-TX5500W
Our online fabric shop: http://www.fishskinfabric.com
1989 Delica P24W Exceed
Panasonic CQ-TX5500W
Our online fabric shop: http://www.fishskinfabric.com
Re: Roof Rust - Mythbuster
Actually I'm going to open up enough of the roof to spray some "Rust Check" in those areas. It's a oily polymer that creeps into cracks, crevices etc. It is long lasting and stops rust from expanding. I lasts for years in a closed area like inside the roof.Green1 wrote:now I'm no expert in rust by any means, but if you only get rid of the rust on the outside, and it has actually gone all the way through, do you not risk having the rust re-appear all around your patch later? (I know I had a professionally done patch on my previous vehicle that had exactly that happen to it)
I'd be much more comfortable getting at the bottom too to be sure that I've gotten all the rust on both sides of the metal.
That way I'll have got it from both sides. It took 15 years to get these little holes. I'm buying another 10 or 15 years the way I'm doing it. Full "Frame Off Restoration" is not warranted or in the budget. This is a practical multi-purpose vehicle. Not a Ducenburg.
I think we have to just accept these spots as another "Delica Thing" like the small drip from the turbo. Full replacement is not warranted at this point. If it doesn't have spots it will. If it has spots, do a reasonable repair and keep the roof from leaking.
Bob
-
ccautos
- Posts: 530
- Joined: Fri Sep 15, 2006 11:25 am
- Member's Photo Album: http://www.delica.ca/Photos/
- Vehicle: 92 Delica SE
- Location: Coombs , BC
- Contact:
Re: Roof Rust - Mythbuster
I have stripped out several crystal light vans for parts and just for a test I pushed a screwdriver straight through the roof panel on the rust spots . Every one came out directly on the point at which the webbing is `glued` to the outer skin . These joints are not spot welds but are a rubberized material used for securing the outer panel . What I have found from much experience with these vans is that the corrosion levels in the inside of the roof are directly comparible to the severity of the water leak coming in through the front windshield panel . My assumption from this is that the water coming in the vehicle at the front then condenses onto the inside of the roof and causes corrosion around the `bonding ` points all over the roof . I have parted five crystal light vans and have never seen a van without some corrosion in and around these bonding points .
Most of the vans will have no corrosion spots on the outside but will be majority on the inside and only when the corrosion starts to get bad does it eat through the panel and become more apparent on the outside . I ave two crystal light vans here for parts right now and we will be taking them to pieces over the next few weeks . Upon doing this I will cut out a section of roof panel to show internal and external roof corrosion and that it eats from inside out (except where it has had stone chip damage and corrosion forms)
Most of the vans will have no corrosion spots on the outside but will be majority on the inside and only when the corrosion starts to get bad does it eat through the panel and become more apparent on the outside . I ave two crystal light vans here for parts right now and we will be taking them to pieces over the next few weeks . Upon doing this I will cut out a section of roof panel to show internal and external roof corrosion and that it eats from inside out (except where it has had stone chip damage and corrosion forms)

Re: Roof Rust - Mythbuster
Glenn,ccautos wrote:I have stripped out several crystal light vans for parts and just for a test I pushed a screwdriver straight through the roof panel on the rust spots . Every one came out directly on the point at which the webbing is `glued` to the outer skin . These joints are not spot welds but are a rubberized material used for securing the outer panel . What I have found from much experience with these vans is that the corrosion levels in the inside of the roof are directly comparible to the severity of the water leak coming in through the front windshield panel . My assumption from this is that the water coming in the vehicle at the front then condenses onto the inside of the roof and causes corrosion around the `bonding ` points all over the roof . I have parted five crystal light vans and have never seen a van without some corrosion in and around these bonding points .
Most of the vans will have no corrosion spots on the outside but will be majority on the inside and only when the corrosion starts to get bad does it eat through the panel and become more apparent on the outside . I ave two crystal light vans here for parts right now and we will be taking them to pieces over the next few weeks . Upon doing this I will cut out a section of roof panel to show internal and external roof corrosion and that it eats from inside out (except where it has had stone chip damage and corrosion forms)
I look forward to seeing these pictures showing more corrosion on the inside than the outside. Should be very enlightening to all Delica owners.
Bob
-
JMK
- Posts: 777
- Joined: Thu Sep 20, 2007 8:42 pm
- Vehicle: 92 Chamonix
- Location: Rocky Mountains, Alberta, Canada
Re: Roof Rust - Mythbuster
Is this leak then also something to be concerned about with non crystalyte roofs? As I have not seen any signs of rust on my high roof Chamonix that does not have any glass in it, I assumed I was not prone to this problem, but perhaps I am mistaken in my ignorant bliss?the water leak coming in through the front windshield panel .
-
ccautos
- Posts: 530
- Joined: Fri Sep 15, 2006 11:25 am
- Member's Photo Album: http://www.delica.ca/Photos/
- Vehicle: 92 Delica SE
- Location: Coombs , BC
- Contact:
Re: Roof Rust - Mythbuster
The non-crystal light roof does not have the same corrosion problem . It is only the areas around the crystal light webbing bonding that has rust .
Re: Roof Rust - Mythbuster
So now the holes are all filled, sanded, refilled, sanded, primered, sanded, painted. Looks like a new roof now and still have to do the clear coat.
You can see in the pictures how the filler just fills the dished out area that had been rust. No bare metal left showing outside the fiberglass. Very important to seal the bare metal. The fiberglass is absolutely water proof, no moisture will get at those spots from above. If it should continue to rust from below it will be a very long time indeed before it gets around those patches.
Sprayed some "Rust Check" into the areas where the holes were from underneath, especially the large ones in the front. Was only able to use the long red straw through the gaps around the big light, but the stuff creeps and spreads on it's own. It should help a lot.
Like I said earlier. It took 15 years to get this way, it's good for many years now.
I sprayed several coats of paint over the roof to give it a good heavy layer.
Once good and hard I'll sand with ultra fine 2000 or finer and do the clear as I didn't have a booth so have a few critters stuck to the roof.
Used commercial grade paint from my buddies shop, not spray bombs.
I'll post pictures of the finished product, looks like a new roof already.
Interesting Glen says the spots that let go were bonded with a glue type product not spot welded. I guess they cheaped out and only bonded spots instead of the whole strip. So wherever the bond let go it removed the anti corrosion coating to expose the steel.
Bob
- Attachments
-
- another hole.jpg (29.05 KiB) Viewed 8709 times
-
- yet another hole.jpg (29.29 KiB) Viewed 8710 times
-
- small hole filled.jpg (38.55 KiB) Viewed 8709 times
-
- other large hole.jpg (26.53 KiB) Viewed 8709 times
-
- large hole filled.jpg (38.07 KiB) Viewed 8709 times
Re: Roof Rust - Mythbuster
Roof repair completed. Van was sold yesterday.
Bob
Bob
- Attachments
-
- finished.jpg (87.6 KiB) Viewed 8680 times
-
ccautos
- Posts: 530
- Joined: Fri Sep 15, 2006 11:25 am
- Member's Photo Album: http://www.delica.ca/Photos/
- Vehicle: 92 Delica SE
- Location: Coombs , BC
- Contact:
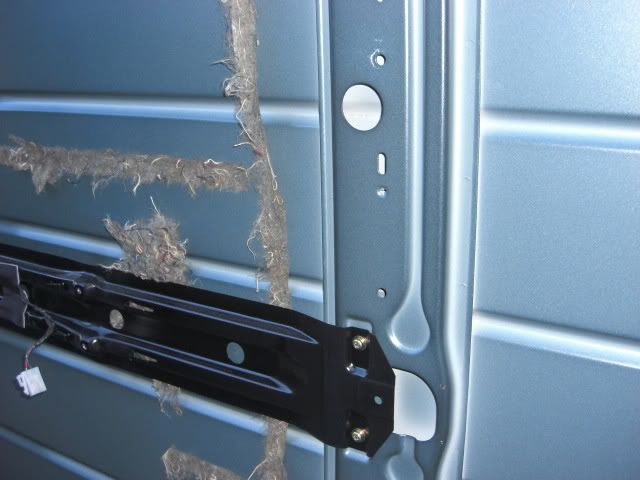
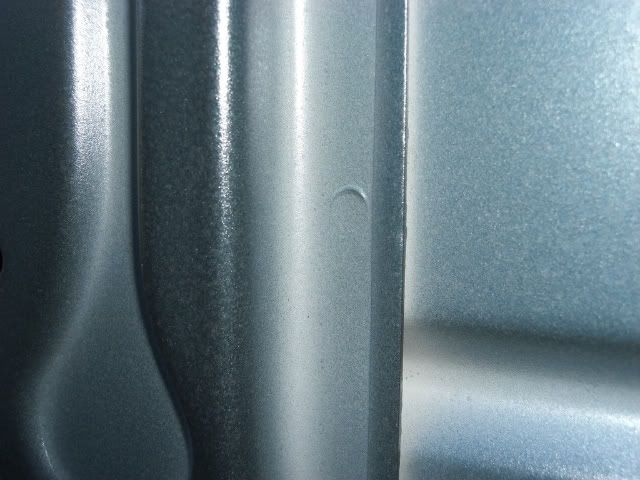
Re: Roof Rust - Mythbuster
Here are the pictures of the inside roof panels of a low roof with no sunroof . Interestingly they do spot weld these and then attach the black panel for interior light and trim support . I will post different roof designs as we strip out vehicles .