Hi all,
My rear captains chairs have now become vomit-inducing [literally!] when I take the van off the pavement. I am going through the wobble fix in the Delica Wiki (and through the many forum posts here, and the prolific posts on the UK site...) but the saga of the missing pictures continues.
Can anyone who has done this shed some light?
I've managed to get everything apart, and I see...... washers already in a couple places. Hmmm.. the wiki description ( https://www.socialtext.net:443/delica/c ... wobble_fix ) and the original forum post ( http://www.delica.ca/forum/captain-chai ... x-334.html ) don't mention this. In fact, I am stumbling on this text:
"then you need to lever up the plate that the bolts go through and place a washer under it in the place were you have removed the bolt"
To me there are 3 places to add washers (A, B, C in attached picture). It would help if they mentioned the purpose of the washers.. (eg. add space here, close this gap, etc.) but it's midnight and there are too many spring loaded pieces for me to figure this out...
Can someone tell me... where to go and how to get there?
Thanks,
Bob Bobbelina
the never ending wobble story
- shealy
- Posts: 160
- Joined: Tue Feb 15, 2011 11:02 am
- Member's Photo Album: http://www.delica.ca/Photos/
- Vehicle: 92 Delica Exceed
- Location: Vancouver, BC
Re: the never ending wobble story
If I remember correctly, you actually have to loosen the bolts you've marked. Loosen one side, freeing up that circular spin plate. You may have some older washers underneath/in between that plate. This is where you're putting the washers to fix the wobble. Then tighten up again, repeat for the other side. There should be four (I think) washers per plate. Its been a while since I did this job though, so I'm just giving you info by memory, so maybe someone who's done it more recently can give more info if I'm wrong!
Super finicky job....I wish I could say enjoy.
-
- Posts: 2
- Joined: Wed Apr 30, 2008 7:58 pm
- Vehicle: 1992 Delica Exceed
- Location: Salt Spring Island
Re: the never ending wobble story
You are saying we need to add more space for the disc? Position B?
From the pic:
A is next to the head of the bolt
B is between the two bolted plates
C is under the bottom plate
Positions A and B already had washers when I opened up the seat. I'm not clear where or why the additional washers go. Does the center disc need more room or less room? Are we trying to raise both of the plates that sandwich the center disc?
I'd be happy if someone just confirmed, "put the washer(s) at C because that works" -- although doing anything without answering 'why' is always a struggle for me.. Need to get this done before the wife and babe get home!
Thanks,
Bobble-head
-
- Posts: 10
- Joined: Sun Nov 01, 2009 1:21 pm
- Member's Photo Album: http://www.delica.ca/Photos/
- Vehicle: 1991 Exceed
Re: the never ending wobble story
I'm in the middle of doing this myself - yesterday I added washers just anywhere they would go and made the wobble worse.
Looking at Mystery Machine's excellent photos for his captain's chair mod http://www.delica.ca/forum/captain-chai ... air+wobble he shows a disintegrated nylon disk below the slotted disk he is modding, that he thinks caused the wobble. In this picture you can see where he put the washer, underneath both plates.

So I'm guessing that the washers go in your position C - in theory shimming up the plates to make up for that disintegrated nylon ring. I'm going to go do it now and see if it works - I'll update later.
- nxski
- Posts: 3268
- Joined: Tue Aug 31, 2010 6:27 pm
- Member's Photo Album: http://www.delica.ca/Photos/
- Vehicle: 1991 Delica L300 Super Exceed
- Location: Coquitlam
- Location: BC, Canada
- Contact:
Re: the never ending wobble story
I can narrow it down to B or C. When I did it I tested both and it was obvious which one was correct. One position will make the wobble worse, the other will improve it. I ended up having to use 3 washers per bolt before the wobble went away.
Live the life you love, love the life you live...
Had: 1991 Mitsubishi Delica L300 SuperExceed, heavily modified (totalled by a drunk driver)
Have: 2011 Acura CSX manual, lightly modified
Want: Mitsubishi Pajero Evo
http://nes-design-construction.com
http://ca.linkedin.com/pub/nicolas-spurling/46/b48/924
Nicola Spurling
Had: 1991 Mitsubishi Delica L300 SuperExceed, heavily modified (totalled by a drunk driver)
Have: 2011 Acura CSX manual, lightly modified
Want: Mitsubishi Pajero Evo
http://nes-design-construction.com
http://ca.linkedin.com/pub/nicolas-spurling/46/b48/924
Nicola Spurling
-
- Posts: 10
- Joined: Sun Nov 01, 2009 1:21 pm
- Member's Photo Album: http://www.delica.ca/Photos/
- Vehicle: 1991 Exceed
Re: the never ending wobble story
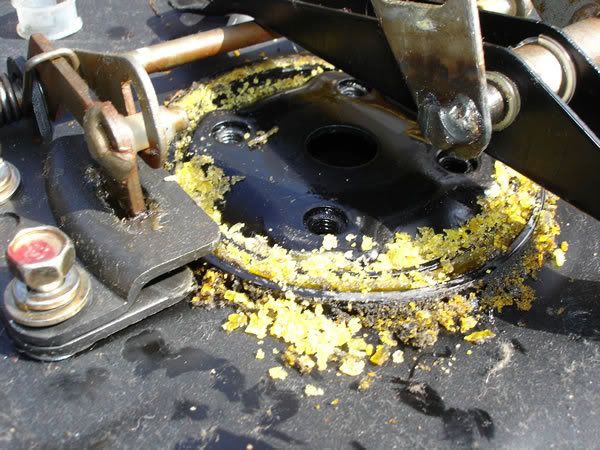
Position C is absolutely right. If you want to call Position A above the 2 flanges that hold the circular spin plate ("disc") in place, and Position B between the 2 flanges I found 4 thin washers in Position C, which I left in place and put a set of 4 new washers on top these (between the base and the two sets of flanges on either side.) The result is that you bringing the disc up slightly higher to make up for the worn-down nylon ring. Final result - no wobble.
If you want to avoid disassembling the whole seat mechanism (as per Mystery Machines' mod instructions) then I don't see that it makes a difference if the new washers are above or below your existing washers, just make sure they are in Position C. Yesterday I put them in position B and just made the wobble worse. If you have washers in there take them out. I also had washers under the disk, which I removed. Washers in Position A make no difference one way or the other, except that the bolts need a washer and a lock washer, obviously.
New no-struggle reassembly process:
While reassembling I discovered the following order to be easier, and eliminates having to wrestle the whole damn seat into place at the end:
1. Re-torque the four 6mm hex head bolts going through the 2 flanges that hold the disc.
2. Place the seat bottom upside down on a milk crate or something (to keep it clean). Place the metal base (upside down) on top of the 4 bolts coming up off the seat bottom.
3. Find the 2 nylon cuffs that go onto the 2 release links on the base and replace them (you did take them off and put them somewhere safe, didn't you?) Attach the 2 levers from the seat to the 2 release links on the base and replace the R-clips. I used a set of vice grips to hold things together while I put in the R-clips. Pull the seat belt through the loop in the seat to get it out of the way.
4. Now replace and torque the four 12 mm nuts that hold the seat base to the seat.
5. Flip over the seat+base and go install it to the runners on the Delica with the the four 14mm lock washers and nuts. I found this challenging until I realized I had bent the tabs that go into the track between the bolts as I was removing the heavy, heavy seat. (I bent them back to right angles with an adjustable wrench - no problem). Once installed the seat+base is happy to rotate through 360 degrees, presenting you with the side you're working on at eye level while you squat outside the Delica's sliding door. No more heavy lifting! Rotate the seat so the rear is facing you.
6. Lay the seat back onto the seat, replace the extended-head 10 mm hex bolt, lock nut and washer combo on the right side of the seat back, then the two 14 mm hex bolts on the left side of the seat back.
7. Rotate the seat round while you reinstall the left and right plastic trim panels. Careful - the rear screw on the left panel is a different size than all the rest of the trim screws. Replace the handles of the 3 release levers on the left side.
8. Reinstall the front and back plastic trim panels. Clip them into the top of the left and right panels first, then push them down and snap the 4 pins into the holes of the other 2 panels. You might need to push the left and right panels together to get everything to clip into place. Now install the 2 trim screw into the front and the back panels.
9. Sit on your captains chair and rock back and forth. If the wobble is gone then great. Otherwise you have to go through the whole process again and add another set of washers where you put the first four. It gets much faster the second and third time you do this.
