Page 47 of 59
Re: What did you do TO your Delica today?
Posted: Tue Apr 05, 2016 10:09 pm
by Growlerbearnz
Re: What did you do TO your Delica today?
Posted: Tue Apr 05, 2016 10:20 pm
by thelazygreenfox
Wow!!! Very well done, like the colour, design and the initiative.

MD
Re: What did you do TO your Delica today?
Posted: Tue Apr 05, 2016 10:45 pm
by Morganizer
I added a layer of foam insulation in the back and wow! did it ever make it quieter.
I read an article that said that one of the differences between economy cars and luxury cars is, luxury cars have better insulation, that absorbs road noise. I looked up products for cars, and they're closed cell foam. I happened to have a roll of closed cell foam so...
This stuff is around 3/32" thick, barely anything. I rolled back the carpet and cut pieces to fit the floor and over the wheel wells. I stuck it down using LePages water-based contact cement. I sleep in the back camping, so I didn't want anything that releases fumes. This stuff takes 40 minutes to set up, but I just interspersed it with other minor repairs.
I can hardly believe what a difference it made to road noise! Now I hear more from the front than from the back of the van. I'm going to apply more insulation up front over the wheel wells, and quiet it down some more.
Oh by the way...does anyone know what those pieces of metal are bolted behind the wheel wells? Either they're something to do with the back seat (which I've never put in) or they modify the appearance of the humps in the carpet to be more aesthetically pleasing.
Re: What did you do TO your Delica today?
Posted: Wed Apr 06, 2016 9:24 am
by FalcoColumbarius
Morganizer wrote:... Oh by the way...does anyone know what those pieces of metal are bolted behind the wheel wells? ...
I'm wondering if it's some sort of anchor for something in the wheel well, perhaps for the mud flap?
Falco.
Re: What did you do TO your Delica today?
Posted: Sat Apr 09, 2016 5:24 pm
by lrp374
I finally finished the last phase of my winch project. I made a spare tire carrier to use the 2" receiver type hitch I installed as part of the winch. It sticks out a lot farther than I planned but the good news is I can use it on the trailer hitch @ the back.
Re: What did you do TO your Delica today?
Posted: Sat Apr 09, 2016 8:04 pm
by Growlerbearnz
Nice! Though my immediate thought was...

- stoppie.jpeg (12.78 KiB) Viewed 10902 times
Re: What did you do TO your Delica today?
Posted: Thu May 12, 2016 9:40 am
by FalcoColumbarius
I did a Rebuild for my Alternator. Drove out to the shop, parked in the dirt lane behind the shop, took the driver's side apart and crawled under the wagon, removed said alternator, took it into the shop ~ went for coffee at the local Starbucks and did a little internet surfing. Three hours later I picked up my rebuilt Alternator (exhibit A):
Beautiful job. Put her all back together and was on my merry way.
Next day she wouldn't start. Oh dear. Started reading up in group 16 & 11 and was preparing myself to invest in some new tools when it dawned on me that there was this repeating phrase in bold letters: - Always be sure to check the following before the test.
- Alternator installation
- Alternator drive belt tension (Refer to GROUP 11 On-vehicle Service.)
- Fusible Link
- Abnormal noise from the alternator while the engine is running
Eventually it occurred to me ~ Fusible Link. So today I went to Lordco (Edmonds) and purchased the 100A fusible link; installed it, turned on the engine and idled her at 1,500 RPM; broke out the el cheapo multi-meter ~ 13.89V-14.00V. Right-on! She's charging.
Scratched up my forearms a little. I ended up removing the fan shroud and fan in order to get more convenient access to the alternator and checked the fan clutch while I was in there (it was good, with tension). Practical application for the alternator itself was ~ three 12mm bolts, two oil lines, two electrical lines and two vacuum lines. I set the deflection to ten or twelve millimeters. Got to remember to remove battery negative when toying with these things, the B cable end found the frame.  Oh-oh ~ failure of the power dispersed! Or some such rot. Probably what fried my fusible link.
Falco.
Re: What did you do TO your Delica today?
Posted: Fri May 27, 2016 10:51 am
by ChuckBlack
naterade wrote:Changed the oil yesterday, I think I waited a bit too long this time, but she sure is happy now with fresh clean oil
Next project is to remove front bush guard to sand and paint. Has anyone done this? Is it a difficult process?

i'm about to do the same... has anyone done it?
Re: What did you do TO your Delica today?
Posted: Sat May 28, 2016 11:52 am
by FalcoColumbarius
ChuckBlack wrote:naterade wrote:Changed the oil yesterday, I think I waited a bit too long this time, but she sure is happy now with fresh clean oil
Next project is to remove front bush guard to sand and paint. Has anyone done this? Is it a difficult process?
i'm about to do the same... has anyone done it?
Change the oil? Every 5,000 kliks. 6.5 litres of 5W40 (or 15W40). I use Total Quartz 9000 full synthetic. Get an oil tray from Cdn Tire; I find it better to do it when the oil is warm, that is drive it in the morning, park for an hour then change the oil. This way if you get splashed, the oil is warm enough to drain efficiently but not HOT enough to scald you. Take the cap off; put the tray under the 17mm oil drain bolt on the lower right side of the motor's oil pan; remove the oil drain bolt and let the oil out. Once drained, remove and replace the oil filter (right side of the motor); replace oil drain bolt (40Nms or 29 Ft Lbs); pour 6.5 litres into the hole that the oil cap usually occupies. Further reference: http://www.delica.ca/forum/viewtopic.php?f=17&t=7337
Regarding removal of the bambi bar: Six bolts, four under the shroud, two under the assembly, follow the pipes. If you have fog lamps then you will need to unplug and remove them before you get to the bolts.
Falco.
Re: What did you do TO your Delica today?
Posted: Thu Jun 02, 2016 12:54 pm
by FalcoColumbarius
Not sure what happened but I went to wash my wagon and oops, I accidentally detailed her. I took pictures as I took the bambi bars off so I'll post them in L300 Technical.
Falco.
Re: What did you do TO your Delica today?
Posted: Sat Jun 04, 2016 7:27 pm
by almac
oil change with filter & air filter. looks like I have a leak down there somewhere...

everything on top is bone dry head/valve cover is dry. rad looks ok. front seals ok.
also noticed today that my fuel tank is dripping... might need to replace. I wonder if the diesel is somehow getting splashed backwards onto the oil pan somehow? IDK.
anyone know GOOD DEAL on a fuel tank?
fun... fun...

Re: What did you do TO your Delica today?
Posted: Wed Jun 15, 2016 11:01 pm
by kurtiswilk
Changed out some dead dash and switch bulbs with leds.
Wanted a red but ended up with a blue, which looks pretty nice. Red was just to dim. All the warning lights and other also got changed to the appropriate color led.
The bright white switches to the lower left of the steering wheel just didn't light up at all. Most were actually missing the bulb holder. Soldered led right to the posts.
The rear defroster and hazard were burnt out. They got replaced with leds as well.
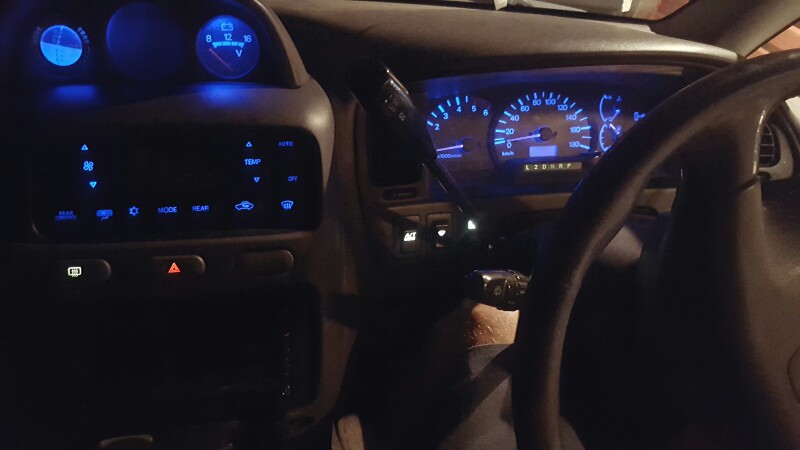
- 20160615_232839-800x450.jpg (52.18 KiB) Viewed 10689 times
Re: What did you do TO your Delica today?
Posted: Sun Jun 26, 2016 8:39 am
by Eli.haveman
Just thought i would poke my head in and share my recent Delica related offerings. Ive spent a TON of time in the last few weeks under, on top of, in and around my Deli and I believe im just about ready to stop tinkering... for now. :)
The first and most obvious project i tackled was to camperize the van. Ive designed the bed to retract similar to a Westy but sort of my own version. There is a strap located on the middle section of bed that when pulled, converts the bed to a lovely two sided bench seat. I have almost finished sewing the cushion covers on the foam pieces and then the bed portion is finished.
This past week I also finished up moving my spare from under to behind. I fabricated a rear spare tire mount that can swing out of the way in order to get the gate up. If you look you'll notice a red handled latch. This pulls the arm tight to the rest of the frame and holds it snug. Behind the plate is a pin which slides though and lock the arm in place while driving. I figure while camping etc. just leave the pin out and use the latch to quickly open a close the arm.
With the spare on the back I am now able to use all the space under the rear end. I decided to place my aux battery there. I built a box for the battery and coated it in truck bed liner spray. If you notice on the roof i now have my solar panel mounted as well so i can charge the aux battery. The lines are going to be tidied up a bit on the top but they run neatly into the door and then out through the bottom to the battery and back in to my inverter and 12v dc cooler. There is a junction box so i can tap in to the power and route it any way i need to. In the front of the bed there is a 120v outlet with USB chargers.
Last night I finished up installing new rotors and pads on the front. By the looks of it, i dont even know when the last time they were changes was. The old rotors were badly pitted and i was getting a real shimmy shimmy shake going on when brakeing especially at high speeds. With the new brakes on, things are super duper smooth. :) I have a new CV boot to install as well but due to frustration and mosquitoes i decided to let that one sit for now. Will get to it soon though, and until then no sand dunes!!! :)
I'll be going away next weekend to the US of A and so i will make sure all the paperwork is in order (ie insurance and ownership etc. so that they dont think im selling her - NEVER hahaha).
Some pics
[img]
https://drive.google.com/open?id=0B9ep9 ... 0dRVzA/img]
https://drive.google.com/open?id=0B9ep9 ... 0FyR0dRVzA
Re: What did you do TO your Delica today?
Posted: Mon Jun 27, 2016 9:40 pm
by msimps
Well I didn't do much, but what a difference! This weekend I 'blanked' my EGR by pulling and plugging the vacuum hose connected to it, began using Howes diesel treat in my fuel, and I gave her a good run to Princeton and back. She's idling WAY smoother and seems to have a bit more get up and go.
Next on the list is a pyro and boost gauge install. I had ordered a pyro from summit for this trip, but it showed up damaged

so I just nursed her up the hills (2500-3000rpm or roughly 60km/h) on the Princeton run. Needless to say those gauges are next on my list, along with a new fuel filter!
Re: What did you do TO your Delica today?
Posted: Thu Jun 30, 2016 7:20 pm
by FalcoColumbarius
I replaced my right rear axle's inner/outer seals, O ring, bearing and retainer. Cleaned out my drum brakes while I was at it and consequently bled my brakes. It was a learning experience. Every-so-often one must step out of one's comfort zone and learn something new. Next time I do this I will take the axle to somewhere with a shop press. Trying to pound it into place with a lump hammer and pipe just doesn't work and creates trauma to your elbow/forearm. After beating it senselessly for an hour, I took it down to my friend's garage, who placed the axle/retainer into his 50 tonne shop press, casually pulled a lever and handed my axle back to me. Just that easy!
Falco.
