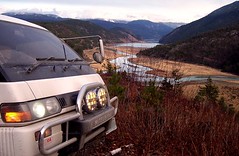
Hi all, well after a couple of years of lurking here and converting Delicas to WVO for others, I decided to pick up one for my own use. It is a 1991 with 63,000 km, obtained from our local importer, Mustang Connection / JCruisers, over in Armstrong (I am in Salmon Arm) and It will be converted soon. It's white, basically the same van as Joel's - hi Joel!
We have been supplying kits and components, and doing SVO conversions since 1999, and have converted a half dozen Delicas and have supplied kits and components for a number of others, and they are all working well on WVO. The first one we did was for the Backyard Stringband, and has been from Victoria to St.John's and back a couple of times already, running used cooking oil.
Some people have used our basic 2T-SD60 kit, and others have opted for a higher end kit with the custom aluminum tank underneath, three-port valves, etc. We are now making our own filter, the VM2, and are also making our own tank heater, being tested in Saskatchewan soon, and then made available in the new year, solid aluminum. I have some Delica conversion photos on our web site's blog/photo gallery. Cheers!
Edward Beggs
PlantDrive gets a Delica!
-
PlantDrive
- Posts: 117
- Joined: Thu Dec 11, 2008 10:10 am
- Member's Photo Album: http://www.delica.ca/Photos/
- Vehicle: 1991 Delica
PlantDrive gets a Delica!
Edward Beggs
PlantDrive.ca
Salmon Arm BC
SVO/WVO Kits, Components, Conversions, Consulting, since 1999.
plantdrive.ca@gmail.com
PlantDrive.ca
Salmon Arm BC
SVO/WVO Kits, Components, Conversions, Consulting, since 1999.
plantdrive.ca@gmail.com
-
delicat

- Posts: 2331
- Joined: Thu Jul 26, 2007 6:26 pm
- Member's Photo Album: http://www.delica.ca/Photos/
- Vehicle: '92 Exeed '93 Safari '94 Pajero
- Location: New Westminster, BC
- Location: New Westminster, BC
Re: PlantDrive gets a Delica!
G'day Edward and congratulation on your new acquisition!
Very happy to see you got yourself a great vehicle that you'll no doubt get to know and appreciate even better.
For obvious reason you'll surely convert your van to run on WVO. I've visited your site (blog, photo gallery...) to get ideas on how to install the basic kit I purchased from you. Lot's of information but the actual depicted Delica install didn't do it for me as it was to cramped and made servicing the engine bay a little awkward. If you're interested, check how I ended up installing your kit as it keeps everything tucked away yet still accessible. Here's the link:
http://www.delica.ca/forum/misushi-wvo- ... vo+install
Hopefully you'll get a few ideas out of it and even improve it! I've been very happy with your system, as it's a very recent install I still have a few mods to do to get it to work even better but at the end of the day, I'm a happy camper!
So congratulation again! Hope to meet you soon at a meet or camping trip...
'93 Nissan Patrol
'94 Mitsubishi Pajero
"If it ain't broken, modify it!"
'94 Mitsubishi Pajero
"If it ain't broken, modify it!"
-
jessef

- Posts: 6459
- Joined: Tue Feb 26, 2008 1:27 pm
- Vehicle: JDM flavour of the month
- Location: Vancouver
- Location: Vancouver, BC
Re: PlantDrive gets a Delica!
Welcome Edward 
-
PlantDrive
- Posts: 117
- Joined: Thu Dec 11, 2008 10:10 am
- Member's Photo Album: http://www.delica.ca/Photos/
- Vehicle: 1991 Delica
Re: PlantDrive gets a Delica!
Thanks for the welcome! Nice to see the pictures of our components in use - good work, I like the hydraulic fitting idea, but I think for mine, I'll stick to a gravity feed filler through the floor at the back. We put a nice spill plate around the flush-mount filler, and you can then pour directly from NATO can into a funnel of course, and keeping an eye on the fuel gauge that is mounted at the rear, for this tank.
The valve mounting and Vegtherm mounting is very nice, a little extra time and work to do it like that, but it certainly is out of the way. Nice work.
Some people really go all out, and some want to keep it simple, and keep the install time/cost down; we try to be as flexible as possible on that.
I'll be using our custom 1/4" aluminum tank on mine, mounting the VM2 filter right on the tank, similar to what we did on the last one we converted here, which worked great, the filter is easy to get at, up out of harm's way, and exceptionally well heated, and uses all ORB fittings.
Anyway, should be fun, when I get around to it...early in the New Year. For now, I am just getting used to RHD again, it's been a few years since I sold my old Town Ace, and have been driving an 85 BJ60 for a while (it's for sale, coverted, lots of new parts, if you know anyone interested....
Edward Beggs
PlantDrive.ca
Salmon Arm BC
SVO/WVO Kits, Components, Conversions, Consulting, since 1999.
plantdrive.ca@gmail.com
PlantDrive.ca
Salmon Arm BC
SVO/WVO Kits, Components, Conversions, Consulting, since 1999.
plantdrive.ca@gmail.com
-
BCDelica

- Posts: 1808
- Joined: Tue Jul 18, 2006 4:12 pm
- Member's Photo Album: http://www.delica.ca/Photos/index.php?cat=10008
- Vehicle: WVO Powered Tuk Tuk
- Location: Central Van Isle
- Location: Somewhere with plenty of sun
Re: PlantDrive gets a Delica!
Welcome aboard Ed! Looking forward to seeing pictures of your install.
Have you considered a WVO Exterior filling point for your Delica? The body panel rear walls lend themselves well to this.
These are the filling points I installed on mine (always thought a swing out rear light assembly, with WVO filling inside, would be a nifty project);
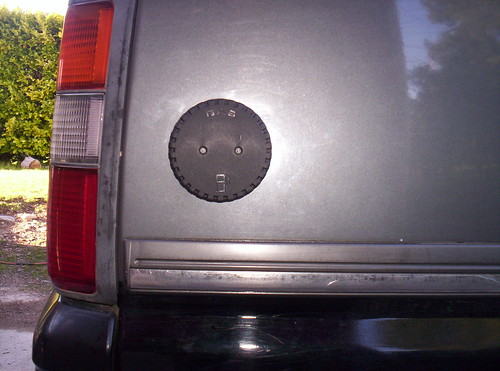
Have you considered a WVO Exterior filling point for your Delica? The body panel rear walls lend themselves well to this.
These are the filling points I installed on mine (always thought a swing out rear light assembly, with WVO filling inside, would be a nifty project);
- Attachments
-
- Randisnewfilller.JPG (111.68 KiB) Viewed 3011 times
 Call me BCDelica-less
-
PlantDrive
- Posts: 117
- Joined: Thu Dec 11, 2008 10:10 am
- Member's Photo Album: http://www.delica.ca/Photos/
- Vehicle: 1991 Delica
Re: PlantDrive gets a Delica!
Looks nice. I did a filler like the first one through the wall of my 1.9 Vanagon conversion a few years ago.
We'll take another look at that.
So far, the big "spill plate" (complete with lip out and down, at the rear, out over the rear trim, with flush filler cap, and gauge-at-rear, appears simplest for the DIY installer (and least time consuming for when people are coming and staying here a couple of days and want to keep the price down, and get back home).
I also like to put in a big rubber mat from local outfit Dinoflex, in the rear of the vans, too.
They make these really skookum, flat big mats, from recycled tires. Tough, and cheap, too! Every van owner should have a few, one for the rear, one for the outside....maybe custom cut ones for front floor mats (although I have to say I have not tried cutting them - it might be quite a chore).
Anyway, there is no reason a person can't connect a different hose - we just have a threaded stub on the tank, and then we add a length of pipe, then rubber marine grade filler hose, a short piece, and then, from the top, push the flush-filler down into that - a very snug fit - but it does not have to be done that way, just add your own filler of your own design if you prefer.
Edward Beggs
PlantDrive.ca
Salmon Arm BC
SVO/WVO Kits, Components, Conversions, Consulting, since 1999.
plantdrive.ca@gmail.com
PlantDrive.ca
Salmon Arm BC
SVO/WVO Kits, Components, Conversions, Consulting, since 1999.
plantdrive.ca@gmail.com
-
delicat
- Posts: 2331
- Joined: Thu Jul 26, 2007 6:26 pm
- Member's Photo Album: http://www.delica.ca/Photos/
- Vehicle: '92 Exeed '93 Safari '94 Pajero
- Location: New Westminster, BC
- Location: New Westminster, BC
Re: PlantDrive gets a Delica!
Good to hear Edward.
Even better if you could post some pictures of your most interesting installs...
Curious, installing the VM2 against the tank? Does it make the path for the oil going to the engine a little long and cooling down or does it work fine as you would have a Vegtherm...
Did I tell you we really like pictures?
Cheers,
David
'93 Nissan Patrol
'94 Mitsubishi Pajero
"If it ain't broken, modify it!"
'94 Mitsubishi Pajero
"If it ain't broken, modify it!"
-
PlantDrive
- Posts: 117
- Joined: Thu Dec 11, 2008 10:10 am
- Member's Photo Album: http://www.delica.ca/Photos/
- Vehicle: 1991 Delica
Re: PlantDrive gets a Delica!
The oil is heated by the in-tank, coolant operated heater, then again in the coolant-heated filter (which in future incarnations, will be the VM2... or the TurboFyner, your choice, and will be a top-mount filter (element at top) with the element also having our new filter "Took"; a neoprene filter element cover that insulates the element (and looks pretty cool, too!)
Then we heat-trace the vegoil supply line with the coolant lines running to and from the rear heater, then the vegoil supply line follows the original steel hardlines (coolant) across and up to the engine bay....then it's heated again by the Vegtherm....then it returns to a looped return....it all adds up to oil that is heated progressively and is nice and hot where it matters.
I'll be sure to put up some pics once the next one, (likely mine) is done.
- Attachments
-
- VM2thumb.jpg (10.85 KiB) Viewed 2984 times
Edward Beggs
PlantDrive.ca
Salmon Arm BC
SVO/WVO Kits, Components, Conversions, Consulting, since 1999.
plantdrive.ca@gmail.com
PlantDrive.ca
Salmon Arm BC
SVO/WVO Kits, Components, Conversions, Consulting, since 1999.
plantdrive.ca@gmail.com