Here's how to replace your valve cover gasket
Posted: Sat Nov 07, 2009 3:33 pm
Here's how to replace your valve cover gasket
I know this is a pretty easy project for most, but just thought I'd post steps/details on how to change the valve cover gasket in case anyone else wants to tackle this themselves.
Set aside maybe an hour or two, and all you need is:
- 10 mm socket / wrench
- 12mm socket / wrench
- a torque wrench in inch pounds (not 100% necessary but always good to use/have)
Valve cover gasket kit/set which should include:
- valve cover gasket
- small half moon rubber piece
- 2 small rubber bushing/washer type pieces.
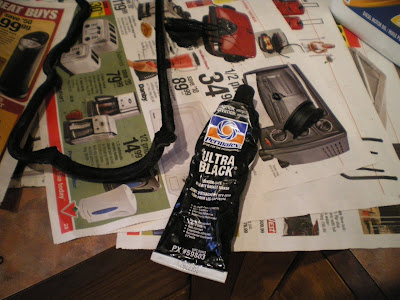
Some Form In Place Gasket goop - (not 100% necessary but comes in handy when placing the small half moon)
Steps:
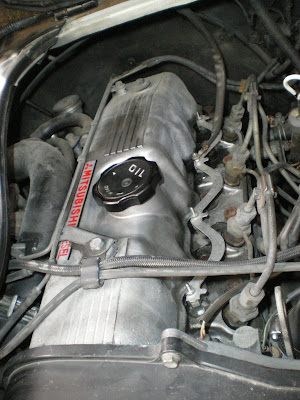
First remove the fan shroud - there's a small obvious clip on top of the fan shroud. Remove this.
Next slide the piece of shroud closest to the passenger door towards yourself to get it to 'unlock'. Push it down into the engine bay in order to get it under and around the upper rad hose and remove this piece of shroud. Next, there's a tiny screw to remove on top of the other half of the fan shroud, remove this screw, and slide the last piece of fan shroud out.
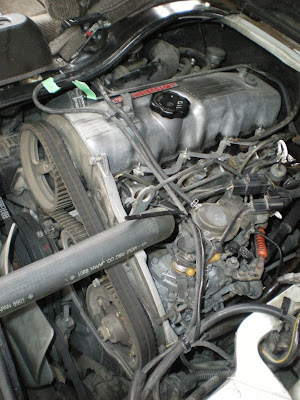
Now remove the timing belt cover. There are 5, maybe 6 bolts to remove. There are 2 longer bolts, and maybe four smaller bolts. The two longer bolts are actually different lengths, so when removing them, just remember which one came from what hole...
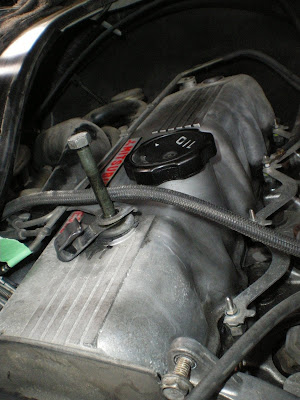
Now you can start to remove the valve cover. There are only 2 bolts holding the cover on. There is also a smaller single bolt near the back of the cover holding the metal vacuum hose assembly to the cover. Remove these bolts but also take note of the order that the additional pieces on the front bolt are assembled so when you reassemble later, you know what piece goes where.
The next step is to remove the small rubber vacuum hoses as well as a larger hose on the far side of the valve cover. Be careful and take your time removing these hoses as some may be brittle/hard and you don't want to tear them. You don't really need to remove all the hoses, just enough so that the metal vacuum tubes can be moved to one side. This will allow for easy removal and installation of the actual valve cover. I removed all the hoses on the front end of the metal vacuum hose assembly. There's also a hose leading from the injection pump - mine was braided - carefully remove this hose too and move it to the side.
**Remember when removing hoses it's a really good idea to use some tape to label each hose as well as where it was connected. So when you go to reassemble, you're not second guessing yourself as to what hose goes where...
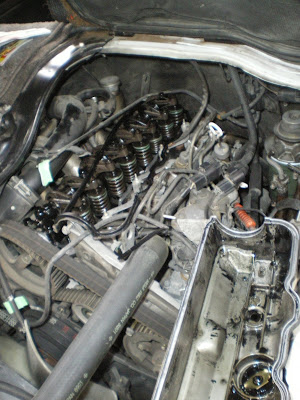
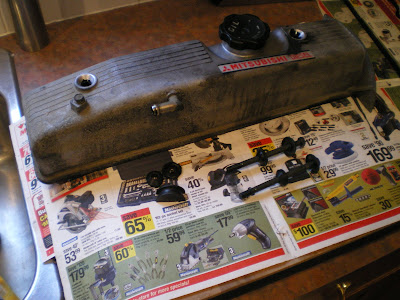
Ok, so the bolts and hoses are removed, so now just give the valve cover a whack with a rubber mallot if needed or just a pop with your fist should allow you to remove the cover. Once the cover is removed, reach back and remove the small rubber half moon. Feel around at the back of the head, and you can pry it out/off with your hands.
Replace the old valve cover gasket with the new and place a small film of fresh oil along the new gasket with your finger. Replace the 2 rubber stoppers/washers onto the long valve cover bolts. Double check the top of the head that it's clean and there are not pieces for dried up gasket stuck to it. If there are any, remove them with a plastic scraper and clean/dry this same surface.
When replacing the half moon, this is where I used some 'Form In Place Gasket' goop. Place a small beed along the curved part of the moon (this is the bottom). This will allow act like a glue to make sure the moon doesn't move once you've place it back on the head and are putting the cover back on top.
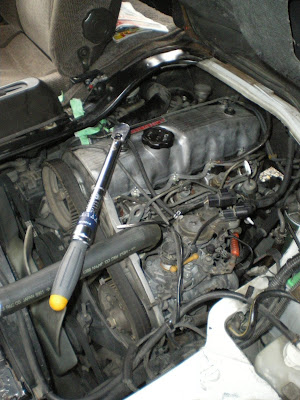
With the new gasket in place in the cover, and the half moon in it's place, put the cover back on top of the head, and replace the long bolts to tighten down the cover. At this point I just finger tightened the cover bolts, then connected all the vaccum hoses and made sure everything was seated properly. Now tighten the large cover bolts to 4-5 foot pounds of torque.
Replace the timing belt cover **Make sure you didn't drip any oil on the belt, if so, make sure you wipe it off well. Tighten the timing belt cover bolts (didn't have a torque for this, but just make sure they're hand tight.) Also, make sure the timing belt cover is seated properly so no outside moisture/grit can make it's way in.
Replace the fan shroud and make sure all the shroud teeth connect - I noticed just as I was about to shut the 'hood' that the last shroud piece wasn't actualy seated properly.
That's it - start her up, let it run for a while and make sure everything is sealed properly and that you have no leaks - especially at the rear half moon area....


I know this is a pretty easy project for most, but just thought I'd post steps/details on how to change the valve cover gasket in case anyone else wants to tackle this themselves.
Set aside maybe an hour or two, and all you need is:
- 10 mm socket / wrench
- 12mm socket / wrench
- a torque wrench in inch pounds (not 100% necessary but always good to use/have)
Valve cover gasket kit/set which should include:
- valve cover gasket
- small half moon rubber piece
- 2 small rubber bushing/washer type pieces.
Some Form In Place Gasket goop - (not 100% necessary but comes in handy when placing the small half moon)
Steps:
First remove the fan shroud - there's a small obvious clip on top of the fan shroud. Remove this.
Next slide the piece of shroud closest to the passenger door towards yourself to get it to 'unlock'. Push it down into the engine bay in order to get it under and around the upper rad hose and remove this piece of shroud. Next, there's a tiny screw to remove on top of the other half of the fan shroud, remove this screw, and slide the last piece of fan shroud out.
Now remove the timing belt cover. There are 5, maybe 6 bolts to remove. There are 2 longer bolts, and maybe four smaller bolts. The two longer bolts are actually different lengths, so when removing them, just remember which one came from what hole...
Now you can start to remove the valve cover. There are only 2 bolts holding the cover on. There is also a smaller single bolt near the back of the cover holding the metal vacuum hose assembly to the cover. Remove these bolts but also take note of the order that the additional pieces on the front bolt are assembled so when you reassemble later, you know what piece goes where.
The next step is to remove the small rubber vacuum hoses as well as a larger hose on the far side of the valve cover. Be careful and take your time removing these hoses as some may be brittle/hard and you don't want to tear them. You don't really need to remove all the hoses, just enough so that the metal vacuum tubes can be moved to one side. This will allow for easy removal and installation of the actual valve cover. I removed all the hoses on the front end of the metal vacuum hose assembly. There's also a hose leading from the injection pump - mine was braided - carefully remove this hose too and move it to the side.
**Remember when removing hoses it's a really good idea to use some tape to label each hose as well as where it was connected. So when you go to reassemble, you're not second guessing yourself as to what hose goes where...
Ok, so the bolts and hoses are removed, so now just give the valve cover a whack with a rubber mallot if needed or just a pop with your fist should allow you to remove the cover. Once the cover is removed, reach back and remove the small rubber half moon. Feel around at the back of the head, and you can pry it out/off with your hands.
Replace the old valve cover gasket with the new and place a small film of fresh oil along the new gasket with your finger. Replace the 2 rubber stoppers/washers onto the long valve cover bolts. Double check the top of the head that it's clean and there are not pieces for dried up gasket stuck to it. If there are any, remove them with a plastic scraper and clean/dry this same surface.
When replacing the half moon, this is where I used some 'Form In Place Gasket' goop. Place a small beed along the curved part of the moon (this is the bottom). This will allow act like a glue to make sure the moon doesn't move once you've place it back on the head and are putting the cover back on top.
With the new gasket in place in the cover, and the half moon in it's place, put the cover back on top of the head, and replace the long bolts to tighten down the cover. At this point I just finger tightened the cover bolts, then connected all the vaccum hoses and made sure everything was seated properly. Now tighten the large cover bolts to 4-5 foot pounds of torque.
Replace the timing belt cover **Make sure you didn't drip any oil on the belt, if so, make sure you wipe it off well. Tighten the timing belt cover bolts (didn't have a torque for this, but just make sure they're hand tight.) Also, make sure the timing belt cover is seated properly so no outside moisture/grit can make it's way in.
Replace the fan shroud and make sure all the shroud teeth connect - I noticed just as I was about to shut the 'hood' that the last shroud piece wasn't actualy seated properly.
That's it - start her up, let it run for a while and make sure everything is sealed properly and that you have no leaks - especially at the rear half moon area....