Hi all,
I've done some searching but can't find a step by step guide to do this. My window was smashed a few days ago and I found a replacement, but don't know if I will be able to install it myself. Has anyone done it? Any special tools or skills required… because I don't have either of those lol.
Thanks
Gary
Replacing front drivers side window
-
g_man1972
- Posts: 111
- Joined: Mon Sep 17, 2007 9:52 am
- Member's Photo Album: http://www.delica.ca/Photos/
- Vehicle: 92 super exceed
- Location: Vancouver

-
g_man1972
- Posts: 111
- Joined: Mon Sep 17, 2007 9:52 am
- Member's Photo Album: http://www.delica.ca/Photos/
- Vehicle: 92 super exceed
- Location: Vancouver
Re: Replacing front drivers side window
Which once again proves that I can't do a successful search on this site 
So it doesn't sound that difficult… famous last words. I'll give it a try myself.
Thanks for finding what I couldn't.
Cheers
So it doesn't sound that difficult… famous last words. I'll give it a try myself.
Thanks for finding what I couldn't.
Cheers
-
FalcoColumbarius

- Site Admin
- Posts: 5983
- Joined: Tue Jan 22, 2008 1:55 pm
- Member's Photo Album: http://www.delica.ca/Photos/index.php?cat=11103
- Vehicle: Delica; Chamonix GLX ('92 P25W)
- Location: North Van, BC, eh?
Re: Replacing front drivers side window
There's also the L400 shop manual under the heading "Body". Although it's not the Starwagon, they go into some detail and I would think that the procedure would be similar. Maybe helpful?
Falco.
Falco.
Sent from my smart pad, using a pen.
Seek Beauty... Good Ship Miss Lil' Bitchi
...... Vision without action is a daydream. Action without vision is a nightmare. ~ Japanese Proverb
Seek Beauty...
Good Ship Miss Lil' Bitchi...... Vision without action is a daydream. Action without vision is a nightmare. ~ Japanese Proverb
-
mararmeisto

- Posts: 3276
- Joined: Wed Sep 19, 2007 10:00 am
- Vehicle: 2018 Ram EcoDiesel
- Location: Dartmouth, NS
Replacing front drivers side window
If you identify where you are situated (just a town, not a street address) you might get lucky and have a helper party show up. Lots of willing hands and big hearts on this forum.
Those able/willing to help should reply in a PM.
Those able/willing to help should reply in a PM.
JPL
I still miss my '94 Pajero!
I still miss my '94 Pajero!
-
g_man1972
- Posts: 111
- Joined: Mon Sep 17, 2007 9:52 am
- Member's Photo Album: http://www.delica.ca/Photos/
- Vehicle: 92 super exceed
- Location: Vancouver
Re: Replacing front drivers side window
Thanks for the replies guys.
I'm stuck though, I got the old window out, got the out side black water guard thing off, but I cannot figure out how to get the new window in. I get the front side in and the back side doesn't line up, get the back in and the front doesn't line up. I'll check the l400 that you linked.
I'm in east van knight and 34 area if anyones happens to be driving around there in the next hour or so lol
-
g_man1972
- Posts: 111
- Joined: Mon Sep 17, 2007 9:52 am
- Member's Photo Album: http://www.delica.ca/Photos/
- Vehicle: 92 super exceed
- Location: Vancouver
Re: Replacing front drivers side window
Okay, finally got it in. I found that by removing the screws that holds the side mirror on allows the door panel to me "bent" a bit outwards allowing it to slide in.
I still can't get the rails to line up though, if pooch or nelson happen to be reading this can you clarify what you meant by loosening the bolts on the right because I can't see any, only the bar with the plastic round thing that turns freely.
At least I can take the garbage bag off the window and keep the freaking rain out.
-
snelson

- Posts: 406
- Joined: Sat Jan 26, 2008 6:29 pm
- Member's Photo Album: http://www.delica.ca/Photos/
- Vehicle: 92 Delica Exceed
- Location: Banff
- Location: Banff, Alberta
Re: Replacing front drivers side window
Hey G-man.
on the door, on the inside there are 4 bolts. The 2 on the right are the ones I removed.
This allows the scissor lift 'system' to be moveable, and will allow you to first get the wheel on the left into the track on the window, and then you just have to fiddle with the wheel/roller on the right to get it to line up and slide into the track. Once the rollers are in the track, then you can put the far right bolts back on.....
As soon as i removed those right side bolts, it was pretty obvious how to get the rollers and tracks to line up...but before that, I was cussing and swearing trying to find some secret/magic way of getting the rollers and track to engage.
In this pic, the bolts would be right around where the word "am" in "am going to replace." is located...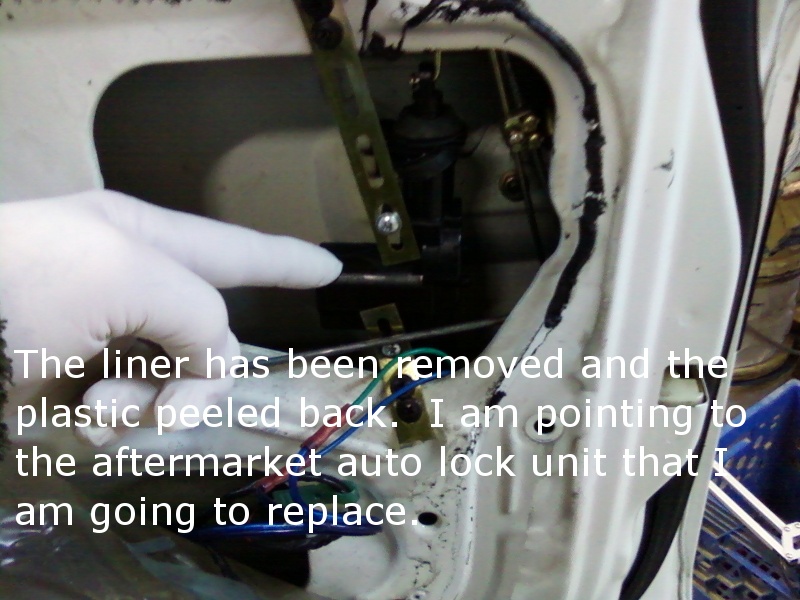
-
g_man1972
- Posts: 111
- Joined: Mon Sep 17, 2007 9:52 am
- Member's Photo Album: http://www.delica.ca/Photos/
- Vehicle: 92 super exceed
- Location: Vancouver
Re: Replacing front drivers side window
Thanks a bunch snelson,
I have no problem saying that I am not in any way, shape, or form a mechanical guy, but eventually I got both tracks lined up following what you said. Thanks for the reply, sure wasn't obvious for me though, still a good amount of cursing and swearing in the pouring rain
After trying for ages to figure out why it kept going up askew and what the extra metal bar was for… I was putting the bolts into the holes for the handle and wondering why it wasn't working, its went up a little askew and then jammed. Can't go up, can't go down and now I'm thinking that I probably should have taken the few strips of masking tape off the window before putting it in. At least it's jammed almost all the way up… and it just may stay that way.
Oh well, that's all I'm doing today, 4 hours in the rain is enough. But if anyone has any idea why this may have happened then please share. I can't really believe that 4 small stripes of masking tape could jam a window, but I have been wrong many, many times before lol.
Happy Halloween!
-
snelson
- Posts: 406
- Joined: Sat Jan 26, 2008 6:29 pm
- Member's Photo Album: http://www.delica.ca/Photos/
- Vehicle: 92 Delica Exceed
- Location: Banff
- Location: Banff, Alberta
Re: Replacing front drivers side window
Jebus H - just spent 20 mins typing out a thoughtful response and it didn't post...grrrr.
Make sure the window is in the channel/groove at the front of the door - towards the door hinges. If it's not going up and down in that groove, that for sure would make it jamb.
Try adjusting the window side to side while raising it a few cms at a time, just to try and centre it.
I doubt tape would throw it off that much.
It's for sure a replacement for a L300 and not a 400?
That's all I can think of, maybe post a pic or a youtube video link. All that stuff helps out the next guy with issues I find....
cheers
-
g_man1972
- Posts: 111
- Joined: Mon Sep 17, 2007 9:52 am
- Member's Photo Album: http://www.delica.ca/Photos/
- Vehicle: 92 super exceed
- Location: Vancouver
Re: Replacing front drivers side window
Geese your good at this, that is totally what happened. The front part is not in the groove, but on the inside of the piece of the rubber where the groove is and the inner door part. And she is stuck mighty good, the back will go down about a cm but the front stays where it is, even with a bit of extra help from me. I think I'll wait till I have an extra pair of hands to operate the switch and try to move it down with both hands on the inner and outer part of the window to see if that works. I'm kind of paranoid about breaking the new window by forcing too much.
At least if anyone else has to do this there will be a good thread about how not to do it thanks to me
At least if anyone else has to do this there will be a good thread about how not to do it thanks to me
-
FalcoColumbarius
- Site Admin
- Posts: 5983
- Joined: Tue Jan 22, 2008 1:55 pm
- Member's Photo Album: http://www.delica.ca/Photos/index.php?cat=11103
- Vehicle: Delica; Chamonix GLX ('92 P25W)
- Location: North Van, BC, eh?
Re: Replacing front drivers side window
Do a "how to" rewrite and we'll load it into the L300 Dedicated Category Reference Forum with a link to the original post.g_man1972 wrote:At least if anyone else has to do this there will be a good thread about how not to do it thanks to me
Falco.
Sent from my smart pad, using a pen.
Seek Beauty... Good Ship Miss Lil' Bitchi
...... Vision without action is a daydream. Action without vision is a nightmare. ~ Japanese Proverb
Seek Beauty...
Good Ship Miss Lil' Bitchi...... Vision without action is a daydream. Action without vision is a nightmare. ~ Japanese Proverb
-
g_man1972
- Posts: 111
- Joined: Mon Sep 17, 2007 9:52 am
- Member's Photo Album: http://www.delica.ca/Photos/
- Vehicle: 92 super exceed
- Location: Vancouver
Re: Replacing front drivers side window
Hi all,
So I took advantage of the lack of rain and finally got it put in right. Snelson was correct, it was not in the track in the front. I managed to free the window by loosening the bolts again and just wiggling, and moving it up and down with the switch and my hands, eventually it came free. I lowered the window to the bottom again and managed to maneuver it into the front guide, put it up and stuck again lol. But I'm learning, there is also a guide at the back.. this one I was able to fix with a long slotted screwdriver, carefully prying the rubber guide to the inside of the window, got that done and presto, up and down with no problems… lost the screw for the door lever though, but that's easily replaced.
Thanks to all to helped and to those who may be doing this and came upon this thread, simply follow this:
http://www.delica.ca/forum/can-someone- ... 13668.html
And note the things that I did wrong so you can avoid them as well. If I had known all that I discovered in this thread before hand it would have been a much MUCH easier install.
-
DavidWilliam
- Posts: 1
- Joined: Sat Nov 17, 2012 5:57 am
- Member's Photo Album: http://www.delica.ca/Photos/
- Vehicle: pajero
- Location: USA
Re: Replacing front drivers side window Mitsubishi magna
You can follow this steps to change the side window..
1.Disconnect the negative cable from the Corolla's battery. This is needed if the door uses any electronics; since you are dealing with the driver's side door, this is very likely.
2.Disconnect the window controls from the door. For power controls, pry the control switch up with a trim stick and disconnect its electrical connector. For a window crank, insert a rag behind the handle and rub it back and forth to disengage the handle's clip.
3.Detach the trim cover for the door's mirror by unscrewing and removing the control handle and prying the cover's retainers loose with a screwdriver.
4.Pry off the trim panels covering the door panel's mounting screws with the trim stick and remove the screws; this includes the door handle's trim piece and the armrest panel.
5.Insert the trim tool behind the door's trim panel and work it around the outer edge to disengage the clips. You can now pull the panel up and off the door and disconnect all electrical connectors behind it.
6.Peel back the plastic watershield covering the door and remove the black plate covering the hole in the door by removing its screws. Pry the weatherstripping out of the top of the door.
7.Remove the mounting bolts attaching the window glass to the window regulator. These bolts should require a hex wrench.
8.Pull the glass up and out of the door. Use caution if the glass is damaged in any way.
9.Lower the replacement glass down into the door. Make sure it is correctly placed within the regulator and secure it with the mounting bolts.
10.Reconnect all parts and trim panels in the reverse order that you removed them.
TE magna