Delicat's new ride! Nissan Safari

Driving a shiny 91 Delica Super Exceed? This is the section to show and tell!
User avatar
delicat
Posts: 2331
Joined: Thu Jul 26, 2007 6:26 pm
Member's Photo Album: http://www.delica.ca/Photos/
Vehicle: '92 Exeed '93 Safari '94 Pajero
Location: New Westminster, BC

Re: Delicat's new ride! Nissan Safari

Post by delicat »

Thanks guys, yup I love that truck too!!!

Paj, too bad you missed on that one but there's tons of them on the auctions if you're really interested... I can help you out with contacts if you ever decide to come to the dark side! And I know very well who bought that one, can't say much more for now but I think I've seen him/her on this forum before 8-) .

And for the bumper I was just playing around until I build a real front bumper for my 8274... I do like how it turned out though!

Cheers,
David
'93 Nissan Patrol
'94 Mitsubishi Pajero
Image

"If it ain't broken, modify it!"
User avatar
mararmeisto
Posts: 3276
Joined: Wed Sep 19, 2007 10:00 am
Vehicle: 2018 Ram EcoDiesel
Location: Dartmouth, NS

Re: Delicat's new ride! Nissan Safari

Post by mararmeisto »

Difficult to tell what you're doing in that picture, other than grinding off the chrome... :?
JPL
I still miss my '94 Pajero!
crushers
Posts: 236
Joined: Wed Mar 14, 2007 8:39 am
Member's Photo Album: http://www.delica.ca/Photos/
Vehicle: Subaru Sambar SC
Location: Owen Sound Ontario

Re: Delicat's new ride! Nissan Safari

Post by crushers »

:shock: :-D :-D 8-)

WOW!! nice score on the second best vehicle in the world!
delicat wrote:I know there's gonna be rotten tomatoes thrown at me for this but I simply couldn't resist! I couldn't bring myself to the look of the L400 so this is my new project...

A '93 Nissan Safari, 5spd, factory rear locker, 4.2 n/a diesel with a bunch of goodies. It's going to be my new long term project. I even had to sign a paper to my wife saying this one would be my last truck, ahhhhhh women! It was worth it!

I imported this truck directly from Japan, it's a grade 4/BB with 76,000km in amazing condition. It will be a challenge to do all the mods to come as it's a 24V system and there's not as much knowledge on this truck here. Veggie (wvo) kit coming in, lift, bypass oil filter, winch, camperizing, front bumper and sliders...

Servicing it has been a breeze, no timing belt or chain. No expensive L400 headlights (paid $45 for both!), only had to change all the fluids and belts although my belts were like new and the oil was still clean. Got to keep the old belts as spares... Even the tires were DOT! So no need to rush into buying new tires until I figure out my lift. Jay won't admit it but he's already got his fingers in there, Custom Made DRL!!! (Thanks Bro!)

Well, I realize this is not the place to discuss this too much in depth but since this forum has been like a family to me I couldn't just keep it away from you!

And yes, Mitsushi will go for sale but no rush, I still want to get her to a pristine condition before advertising...

Cheers,
David
Urban Matador 1.jpg
Urban Matador 2.jpg
Urban Matador 3.jpg
http://www.luxuryimports.ca JDM imports
http://www.crushersrule.com restorations and trip reports
http://www.luxuryimports.ca/faq/importinfo.php import your own Cruiser
http://www.ivoac.ca separating the rumours from the truth. join today
User avatar
delicat
Posts: 2331
Joined: Thu Jul 26, 2007 6:26 pm
Member's Photo Album: http://www.delica.ca/Photos/
Vehicle: '92 Exeed '93 Safari '94 Pajero
Location: New Westminster, BC

Re: Delicat's new ride! Nissan Safari

Post by delicat »

Well fellow RHD lovers, it's been a while since I've updated this post. Lot of mods have been done, even more abuse has been taken and she loves it!

When I bought this truck the 1st mod that really mattered to me was converting it to run on Veggie and it's finally done! As usual, Jay (Tardisdeli) was a big help with this project and I'd still be scratching my head on how to wire everything if it wasn't for him, thanks Jay!

On my veggie set up I'm using the stock 90L tank for my veggie and installed a secondary 60L tank for the diesel as I still need to use diesel on start up in the morning and shut down (purging the lines from veggie at the end of the day). Total of 150L of fuel available, bring on the road trips!

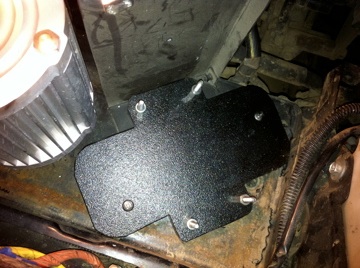
I started by mounting a 24v fuel pump to assist pushing the veggie to the IP. It's a Walbro FRP-16 24v. It's mounted inside the rear crossbar against the rear bumper. It's mounted in a way that it can be easily serviced (extra hose length).

Next was installing a heated Racor fuel filter. I would have prefer to use the Plantdrive one but I had this one in my garage and couldn't justify not using it. I already relocated both batteries inside the cab so I'm lucky to have new space available for other projects including this one. I made a bracket sitting where the driver's side battery used to be and attached the Racor on it. It's slotted so the filter can be lifted out for servicing. Again, extra hose length.

Jay made a platform sitting at the bottom of the Racor bracket to sit the heat exchanger and mounted the HE on it.

I mounted my supply 3 way valve against the Racor bracket so everything is all close together and also close to the IP. Once the oil gets hot it has very limited distance to travel to the IP and less chances to loose heat.

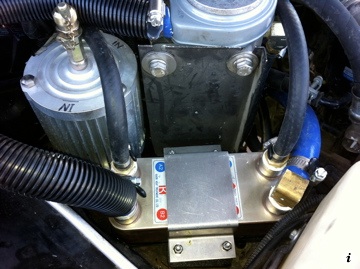
I also mounted a 12v 32amps Vegtherm inline heater, final heating stage. With it I also mounted a sensor (thermostat? attached to one of my injector lines) to control the heat (On at 70 celcius, Off at 90) and this way I don't have to run the Vegtherm as much, mostly just to get thing warmed up quicker in the morning and then as a backup to ensure the oil is always nice and hot.

The 3 way return valve is mounted against the right fender, seemed like it belonged there.

Finally I mounted my ghetto fuel tank on the roof. It will find a better spot at some point but I had this tank in my garage and doing this way allowed me to get going on veggie right away. My future options would be to mount it underneath (not a simple task given it needs it's own filler/venting...) or build a 10L tank and mount it inside the engine bay. Not decided yet and not too high on my priority list anymore. As it stands, the tank is quite low profile (7" tall) and can barely be noticed, especially that it's the same color as the roofrack.

So how does it work?

Start the truck on diesel, drive for 2-5min. Coolant warms up the heated veggie filter and HE (coolant line T from the main line to bring hot coolant to both heaters and return to next main line) then switch to veggie (3 way switch inside the cab). Supply valve turns on, blocks the diesel and alloys veggie instead. Return lines turns on, blocks diesel from returning to tank and alloys veggie to loop back before the Vegtherm. This way the hot oil doesn't get wasted by going back in the wvo tank and gets immediately recirculated in the system.

For shut down at the end of the day I switch to the 3rd position (purge) on the switch inside the cab. Supply valves turns off (alloys diesel), return valves stays on (loops left over wvo back to the IP until it's fully flushed by the diesel). This way I don't end up sending wvo back into the diesel tank.

There might be a way to improve how the coolant flows through the system by forcing it all to go through the HE before being T'd but I need to think a bit more before figuring how to properly do it. Until then the system is still running great as it is, nice and hot!

I've been running it for a few weeks now and the truck loves it as expected. Now I'm paying $0.05/Liter instead of $1.15
I also recycle wasted veggie oil (I get it from a locale Japanese restaurant once they're done with it).
And finally I pollute a lot less. Makes me a Happy Camper!

Cheers,
Mr. D

Pictures description:
1, 2 & 3: WVO fuel pump
4: WVO heated Racor fuel filter mounted behind the bracket
5: Heat Exchanger bracket
6: HE mounted
7: Vegtherm inline heater and 3 way supply valve against Racor bracket
Walbro FRP-16 24v.jpg
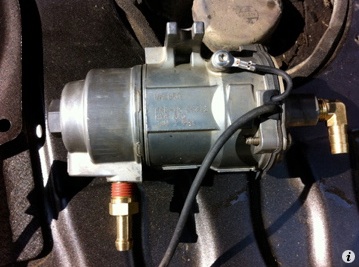
Walbro FRP-16 24v.jpg (49.7 KiB) Viewed 6231 times
Fuel pump servicing.jpg
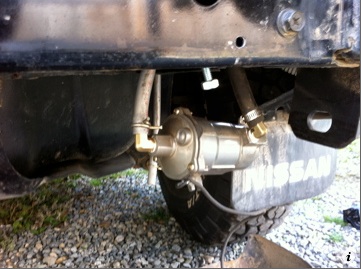
Fuel pump servicing.jpg (50.37 KiB) Viewed 6231 times
Fuel pump mounted.jpg
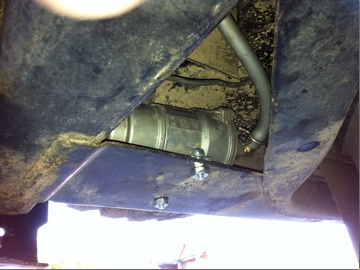
Fuel pump mounted.jpg (43.53 KiB) Viewed 6231 times
Racor mounting bracket.jpg
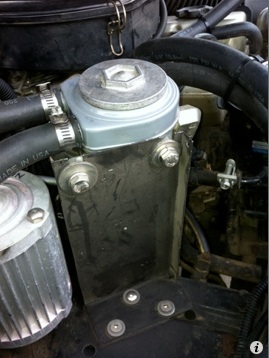
Racor mounting bracket.jpg (44.76 KiB) Viewed 6231 times
HeatExchanger bracket.jpg
HeatExchanger bracket.jpg (52.93 KiB) Viewed 6230 times
Racor & HE mounted.jpg
Racor & HE mounted.jpg (52.86 KiB) Viewed 6230 times
Vegtherm.jpg
Vegtherm.jpg (51.7 KiB) Viewed 6230 times
Last edited by delicat on Sat Oct 30, 2010 1:39 am, edited 2 times in total.
'93 Nissan Patrol
'94 Mitsubishi Pajero
Image

"If it ain't broken, modify it!"
User avatar
delicat
Posts: 2331
Joined: Thu Jul 26, 2007 6:26 pm
Member's Photo Album: http://www.delica.ca/Photos/
Vehicle: '92 Exeed '93 Safari '94 Pajero
Location: New Westminster, BC

Re: Delicat's new ride! Nissan Safari

Post by delicat »

Couple more pictures and details...

1: 3 way return valve
2: Vegtherm sensor allowing to power it on/off within a certain temperature range. (see details in previous page)
3: Coolant lines T'd on main lines
4: Diesel fuel lines (supply and return) going through the bonnet
5: Diesel lines going up the pillar and onto the roofrack
6: Diesel lines making it to the mounted fuel tank on the roof
7: Roof top mounted fuel tank with protection cover for the lines. (I still need to change the fitting for the vent from straight to 90 degree)
Return 3 way valve.jpg
Return 3 way valve.jpg (57.32 KiB) Viewed 6208 times
Heater thermostat.jpg
Heater thermostat.jpg (37.43 KiB) Viewed 6219 times
Coolant pickup & return.jpg
Coolant pickup & return.jpg (44.62 KiB) Viewed 6220 times
Routing diesel lines.jpg
Routing diesel lines.jpg (43.75 KiB) Viewed 6220 times
Routing diesel line 2.jpg
Routing diesel line 2.jpg (48.92 KiB) Viewed 6221 times
Roofrack fuel tank.jpg
Roofrack fuel tank.jpg (36.9 KiB) Viewed 6220 times
Roof mounted tank.jpg
Roof mounted tank.jpg (36.6 KiB) Viewed 6220 times

Soon enough the fuel lines going up by the windshield will be hidden and protected by the 3.5" snorkel I'm working on. This system might be a bit overkilled with the 26plates heat exchanger but my wvo tank isn't heated so it could be even more efficient if I had the patience to do it. With our typical weather here I didn't feel the need to heat the tank, time will tell!

Cheers!
Mr. D
Last edited by delicat on Sat Oct 30, 2010 1:37 am, edited 2 times in total.
'93 Nissan Patrol
'94 Mitsubishi Pajero
Image

"If it ain't broken, modify it!"
User avatar
delicat
Posts: 2331
Joined: Thu Jul 26, 2007 6:26 pm
Member's Photo Album: http://www.delica.ca/Photos/
Vehicle: '92 Exeed '93 Safari '94 Pajero
Location: New Westminster, BC

Re: Delicat's new ride! Nissan Safari

Post by delicat »

And just another little tease...

I mounted my onboard 24v Viair compressor. It's mounted under my seat and best part is that when it's running it's identical to those massage chairs sold for a couple thousand$! :-D Lovely bonus massage!

All left to do is mount my 2 gallons air tank. It's all ready and I've got a good place to mount it under the truck. Next project, mount it and run the lines. One going to the rear for endless air supply (tires...), another line for a air horn and finally another one for the front locker (but that's not on my priority list yet).

I mounted a gauge for the tank pressure and power on/off conveniently by all the other switches. Works for me!

More to come once it's all done.

Cheers,
Mr. D
Compressor ready.jpg
Compressor ready.jpg (42.51 KiB) Viewed 6212 times
Compressor gauge.jpg
Compressor gauge.jpg (53.18 KiB) Viewed 6212 times
Compressor gauge 2.jpg
Compressor gauge 2.jpg (44.52 KiB) Viewed 6211 times
'93 Nissan Patrol
'94 Mitsubishi Pajero
Image

"If it ain't broken, modify it!"
fexlboi
Posts: 1671
Joined: Thu Jun 19, 2008 11:28 pm
Member's Photo Album: http://dinoevo.de
Vehicle: -
Location: -
Contact:

Re: Delicat's new ride! Nissan Safari

Post by fexlboi »

Well done Mr. D! The only mod you still miss on your truck is this:
Attachments
back-to-the-future-flux-capacitor-replica-3.jpg
back-to-the-future-flux-capacitor-replica-3.jpg (40.82 KiB) Viewed 6120 times
User avatar
jwfchase
Posts: 508
Joined: Mon Dec 03, 2007 10:36 pm
Member's Photo Album: http://www.delica.ca/Photos/
Vehicle: '92 Super Exceed
Location: Kamloops, BC

Re: Delicat's new ride! Nissan Safari

Post by jwfchase »

delicat wrote: One going to the rear for endless air supply (tires...), another line for a air horn and finally another one for the front locker (but that's not on my priority list yet).

Yaaaaaahhhh!!! That's the best part! Try and find one from a Firetruck, they sound the coolest, IMHO!!!
User avatar
delicat
Posts: 2331
Joined: Thu Jul 26, 2007 6:26 pm
Member's Photo Album: http://www.delica.ca/Photos/
Vehicle: '92 Exeed '93 Safari '94 Pajero
Location: New Westminster, BC

Re: Delicat's new ride! Nissan Safari

Post by delicat »

Hey Fexlboi wanna save on shipping and order together one each of those Flux-Capacitors? Not!

I've seen the train ones for sale but not the fire truck ones. In either case it must be waaaaay too big. Just need something better than my stock horn which sounds like a 89 Civic (the only un-manly thing on this beast)...

Sooner than later!
'93 Nissan Patrol
'94 Mitsubishi Pajero
Image

"If it ain't broken, modify it!"
User avatar
jessef
Posts: 6459
Joined: Tue Feb 26, 2008 1:27 pm
Vehicle: JDM flavour of the month
Location: Vancouver
Location: Vancouver, BC

Re: Delicat's new ride! Nissan Safari

Post by jessef »

fexlboi wrote:Well done Mr. D! The only mod you still miss on your truck is this:
Make one !

http://www.instructables.com/id/Flux-Capacitor/
User avatar
delicat
Posts: 2331
Joined: Thu Jul 26, 2007 6:26 pm
Member's Photo Album: http://www.delica.ca/Photos/
Vehicle: '92 Exeed '93 Safari '94 Pajero
Location: New Westminster, BC

Re: Delicat's new ride! Nissan Safari

Post by delicat »

Aie aie aie, I've neglected to update this post!

A lot has been done since the last mod so here's a simple one to get started... In preparation for the storage cabinets I'm building and new roof insulation, I took out all the headliner. This allowed me to use these nifty little magnet hooks (strong enough to each hold 20lbs) onto the roof/pillars to partly support these cargo nets. Nothing fancy here but very practical (it's amazing how much stuff you can store up there)! They do their job fine; store my clothes, sleeping bags and other light items when I'm out camping. The nets are also supported by brackets along the roof line so quite strong. If I decide to keep them I'll consider building a bracket across the roof to make it even stronger but so far so good.
Roof storage 1.jpg
Roof storage 1.jpg (118.51 KiB) Viewed 5833 times
Roof storage 2.jpg
Roof storage 2.jpg (116.68 KiB) Viewed 5833 times
Roof storage 3.jpg
Roof storage 3.jpg (184.25 KiB) Viewed 5833 times
Roof storage 4.jpg
Roof storage 4.jpg (153.94 KiB) Viewed 5833 times
Roof storage 5.jpg
Roof storage 5.jpg (168.23 KiB) Viewed 5833 times
'93 Nissan Patrol
'94 Mitsubishi Pajero
Image

"If it ain't broken, modify it!"
User avatar
delicat
Posts: 2331
Joined: Thu Jul 26, 2007 6:26 pm
Member's Photo Album: http://www.delica.ca/Photos/
Vehicle: '92 Exeed '93 Safari '94 Pajero
Location: New Westminster, BC

Re: Delicat's new ride! Nissan Safari

Post by delicat »

Also got started on my wood cabinets but still a long way before the project is fully completed. This is the first unit, the left rear cargo. It's scary how much stuff I can hide in there! I'm posting a picture of the empty cargo to give an idea of the room I have to work with. As you can tell I ditched the middle seats and only kept the back bench. This way I get way more room where I need it and it's also more comfortable for the kids at the back.

Next will be a similar cargo box on the right but much taller (almost to the roof) and I'll replace the rear cargo net with a solid wood box/shelf. Then I'll start the cabinets behind the front seats but that's for down the road.

Cheers!
Mr. D
Rear cargo, bare.jpg
Rear cargo, bare.jpg (121.81 KiB) Viewed 5833 times
Rear left storage 1.jpg
Rear left storage 1.jpg (111.65 KiB) Viewed 5833 times
Rear left storage 2.jpg
Rear left storage 2.jpg (120.61 KiB) Viewed 5833 times
Rear left storage 3.jpg
Rear left storage 3.jpg (119.88 KiB) Viewed 5833 times
Rear left storage 4.jpg
Rear left storage 4.jpg (97.55 KiB) Viewed 5833 times
'93 Nissan Patrol
'94 Mitsubishi Pajero
Image

"If it ain't broken, modify it!"
coaxial

Re: Delicat's new ride! Nissan Safari

Post by coaxial »

delicat wrote:
Rear left storage 1.jpg
What's in there? burritos? ice creams?
User avatar
- GT Style -
Posts: 9
Joined: Thu Jul 05, 2007 1:57 am
Vehicle: Audi's
Location: Tumbler Ridge, BC

Re: Delicat's new ride! Nissan Safari

Post by - GT Style - »

Looks like a nice build, congrats
Michael
User avatar
delicat
Posts: 2331
Joined: Thu Jul 26, 2007 6:26 pm
Member's Photo Album: http://www.delica.ca/Photos/
Vehicle: '92 Exeed '93 Safari '94 Pajero
Location: New Westminster, BC

Re: Delicat's new ride! Nissan Safari

Post by delicat »

Thanks,

Burritos are coming, soon! 8-)
'93 Nissan Patrol
'94 Mitsubishi Pajero
Image

"If it ain't broken, modify it!"
Post Reply

Return to “Member Rides”