Looking for some guidance in tapping the fuel line in an L300 to provide fuel to an Espar D2 air heater clone.
Can I directly break into the existing fuel line and butt a 'T' into it rather than tapping a tube directly into the fuel tank?
Tapping the fuel line to install air heater
Moderator: BCDelica
-
Growlerbearnz

- Posts: 2041
- Joined: Sat Jun 26, 2010 1:58 pm
- Member's Photo Album: http://www.delica.ca/Photos/
- Vehicle: Delica P25W
- Location: New Zealand
Tapping the fuel line to install air heater
I would tee into the rubber fuel hose between the tank and fuel filter. It would be much easier, less likely to break due to vibration, and reversible if it all goes wrong.
Here's an Espar install into a diesel motorhome: https://www.rvworldstore.co.nz/blog/ins ... el-heater/
Here's an Espar install into a diesel motorhome: https://www.rvworldstore.co.nz/blog/ins ... el-heater/
Nothing says "poor workmanship" more than wrinkles in the duct tape.
-
JMK
- Posts: 777
- Joined: Thu Sep 20, 2007 8:42 pm
- Vehicle: 92 Chamonix
- Location: Rocky Mountains, Alberta, Canada
Tapping the fuel line to install air heater
Thanks Growlerbearnz,
Teeing into a rubber line sounds perfect, I was thinking it would be necessary to cut a metal line, with the associated risk of creating filings, etc.
I'll look for the location and go from there. I assume that you would anticipate the possibility of an air bubble and prime the fuel line after the install.
One thing I've noticed about a number of the installs I've seen documented, is none seem to have used the benefits of carbon felt, which can be a very handy material for jobs like this. I'll post some pictures as the job progresses if there's anything positive I can contribute.
I friend just pointed out to me while I wait to finish my install, the mice are probably enjoying the new entrances I created and did not block yesterday.
-
JMK
- Posts: 777
- Joined: Thu Sep 20, 2007 8:42 pm
- Vehicle: 92 Chamonix
- Location: Rocky Mountains, Alberta, Canada
Tapping the fuel line to install air heater
Tonight tested the install by placing the fuel line into a jerry can of diesel. The pump self primes, takes about 5 minutes when the line is vacant.
So now that I know it works, searching for the best spot to drill for fuel led me to contemplating the bleed port on the fuel filter as a possible candidate. Some research seems to indicate that the check valve that was used in another post is a good idea as apparently these heaters can draw back at times. But I'n wondering, if it's possible to find a barb with the same threads as the bleed port on the filter, and using a check valve to stop the fuel backing up and possibly putting air into the fuel system, if this port on the fuel filter would supply fuel on demand to the heater's fuel pump?
Does anyone know perhaps if that port is 'pre', or 'post' filter, and when a vacuum is applied to it, will it supply fuel on demand?
-
204explorer
- Posts: 167
- Joined: Sun Oct 02, 2016 10:19 am
- Member's Photo Album: http://www.delica.ca/Photos/
- Vehicle: l400
- Location: CA
Tapping the fuel line to install air heater
I would follow Growlers advice. I installed plenty of these heaters and never use the supplied fuel pick up tube, unless its already there from a previous heater.
I always cut the rubber fuel line, low and close to the tank and then put a barbed tee fitting in the existing line. Made myself a kit with brass tees and different barb size fittings that thread into the tee. Now its easy to work with different size hoses.
I would not put it in the bleed port of your fuel filter.
I never used a fuel check valve, never had a issue with that.
Also not a fan of coolant line shut off valves. They often cause leaks.
What you might need, depending on your install, is a coolant line check valve.
Sent from my SM-G920W8 using Tapatalk
-
JMK
- Posts: 777
- Joined: Thu Sep 20, 2007 8:42 pm
- Vehicle: 92 Chamonix
- Location: Rocky Mountains, Alberta, Canada
Tapping the fuel line to install air heater
Thanks for that.
I'm just installing an air (bunk) heater, so do not need to tap into coolant. About the only convenient place I can find a rubber fuel line to tap into is the one coming up to the fuel filter, so I may try that.
I did notice in one of the forums that someone mentioned that if they did not stick with the small diameter fuel lines that had more problems with the pump self priming, because the pumps themselves are pretty small, so I thought I should stick with the stock line that came with the kit.
When crawling around under the L300 today I noticed what appeared to be a drain plug on the bottom of the main fuel tank and thought that would be convenient if there was a tap with the same threads as the drain plug.
-
Furi
- Posts: 167
- Joined: Mon Apr 11, 2016 11:00 am
- Member's Photo Album: http://www.delica.ca/Photos/
- Vehicle: 1990 L300
- Location: Queens, NY
Tapping the fuel line to install air heater
I'll be doing the same thing in the next few weeks. Wondering what location you have picked for the heater. Inside the cabin? Or boxed up under the car? Look forward to seeing your install.JMK wrote:Looking for some guidance in tapping the fuel line in an L300 to provide fuel to an Espar D2 air heater clone.
Can I directly break into the existing fuel line and butt a 'T' into it rather than tapping a tube directly into the fuel tank?
-
JMK
- Posts: 777
- Joined: Thu Sep 20, 2007 8:42 pm
- Vehicle: 92 Chamonix
- Location: Rocky Mountains, Alberta, Canada
Tapping the fuel line to install air heater
The successful completion of this project took until last week when I installed a second unit. The things I learnt along the way are more than I had anticipated. I thought about doing video about this project but was too lazy to document each step, especially as I ended up doing the same things over and over until I could figure out a solution then move on to the next problem.
The location I mounted was on the south end of the footwell behind the sliding center door after I met another Delica owner (and his faithful pooch) near the Columbia Icefields who had one mounted there.
The location I mounted was on the south end of the footwell behind the sliding center door after I met another Delica owner (and his faithful pooch) near the Columbia Icefields who had one mounted there.
-
Mr.SA
- Posts: 59
- Joined: Wed Mar 02, 2016 10:40 am
- Member's Photo Album: http://www.delica.ca/Photos/
- Vehicle: Delica L300
- Location: Denver
Tapping the fuel line to install air heater
Can you post a pic of how it’s mounted there? I might be relocating mine next year. It’s in a super inaccessible spot due to my camper build. I’d like to put it somewhere that’s easier to get to.JMK wrote:The successful completion of this project took until last week when I installed a second unit. The things I learnt along the way are more than I had anticipated. I thought about doing video about this project but was too lazy to document each step, especially as I ended up doing the same things over and over until I could figure out a solution then move on to the next problem.
The location I mounted was on the south end of the footwell behind the sliding center door after I met another Delica owner (and his faithful pooch) near the Columbia Icefields who had one mounted there.
-
JMK
- Posts: 777
- Joined: Thu Sep 20, 2007 8:42 pm
- Vehicle: 92 Chamonix
- Location: Rocky Mountains, Alberta, Canada
Tapping the fuel line to install air heater
I just finally got the installation working a few days ago, again had numerous problems which turned out to be due to the exhaust lines and muffler being clogged from the previous problems. I need to sit down and make up a list of some of the important points I've learned which could probably save future installers a lot of grief. I'll try and get some pic's up in the next few hours for starters.
-
JMK
- Posts: 777
- Joined: Thu Sep 20, 2007 8:42 pm
- Vehicle: 92 Chamonix
- Location: Rocky Mountains, Alberta, Canada
Tapping the fuel line to install air heater
Here are some images (the forum casts me shade about image size, so you'll have to use the links to view):
1: Installation Location
http://mparam.s3.amazonaws.com/images/D ... cation.jpg
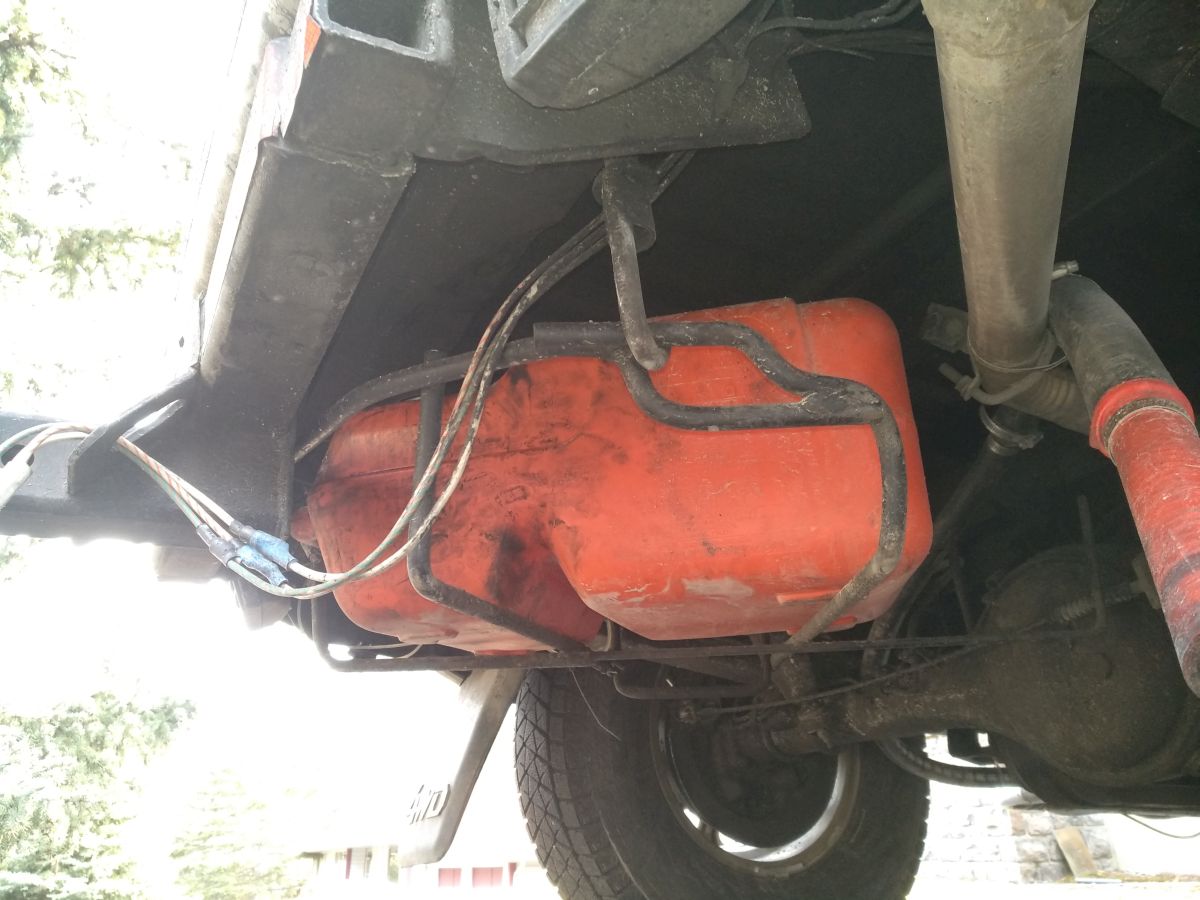
2: View of air intake, exhaust and fuel line from underside. Note carbon felt on exhaust pipe to protect fuel line from heat
http://mparam.s3.amazonaws.com/images/D ... 20Felt.jpg
3: Routing of air intake line
http://mparam.s3.amazonaws.com/images/D ... Intake.jpg
4: Exhaust pipe end location
http://mparam.s3.amazonaws.com/images/D ... 20Pipe.jpg
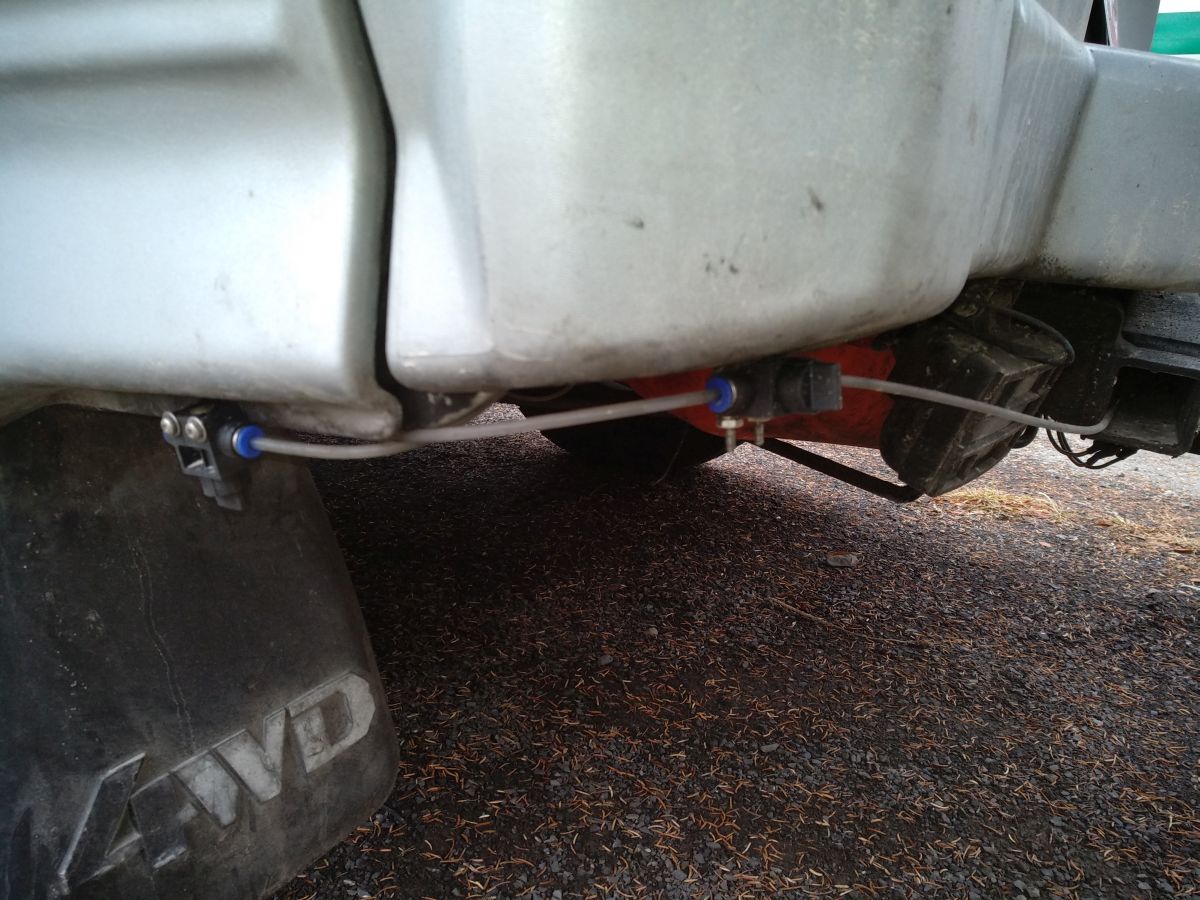
5: Location of fuel tank
http://mparam.s3.amazonaws.com/images/D ... 20Tank.jpg
6: Fuel tank selector switches, switch on left selects diesel, switch on right selects jerry can with kerosene in it.
http://mparam.s3.amazonaws.com/images/D ... itches.jpg
Heater Installation Tips:
1: Use analog controller thermostat switch if you plan to camp at altitude
2: Do not buy/use a chinese muffler or exhaust line
3: have a muffler shop install a proper exhaust line
3: Do not tap your fuel line for source fuel - use separate tank (Delica hates air bubbles, and heater may disagree with some Diesel Treatments or even the reducer T that you'd have to install).
4: Use V Power diesel fuel in your separate tank for higher cetane and better combustion
5: Run kerosene in heater once every 10 uses
6: If you get white smoke, prime the system by blowing air into the air intake during the white smoke cycles (make air inlet accessible, and see blower fan example in pictures)
7: Don't gravity feed the fuel from a roof mounted tank (floods the doser pump).
8: Only use the 4mm fuel line, do not substitute any other size.
9: The fuel line connections are critical, to prevent air lock, make sure ends are butted in the connection,
10: Throw out the cardboard air intake hose and upgrade yourself, I used 1/2" Sched 40 PVC going to a 22mm silicon hose.
Further resources:
https://www.letonkinoisvarnish.co.uk/eb ... tro_1.html
https://www.thesamba.com/vw/forum/viewt ... ?p=8585309
https://sites.google.com/site/whitemank ... us-heizung
1: Installation Location
http://mparam.s3.amazonaws.com/images/D ... cation.jpg
2: View of air intake, exhaust and fuel line from underside. Note carbon felt on exhaust pipe to protect fuel line from heat
http://mparam.s3.amazonaws.com/images/D ... 20Felt.jpg
3: Routing of air intake line
http://mparam.s3.amazonaws.com/images/D ... Intake.jpg
4: Exhaust pipe end location
http://mparam.s3.amazonaws.com/images/D ... 20Pipe.jpg
5: Location of fuel tank
http://mparam.s3.amazonaws.com/images/D ... 20Tank.jpg
6: Fuel tank selector switches, switch on left selects diesel, switch on right selects jerry can with kerosene in it.
http://mparam.s3.amazonaws.com/images/D ... itches.jpg
Heater Installation Tips:
1: Use analog controller thermostat switch if you plan to camp at altitude
2: Do not buy/use a chinese muffler or exhaust line
3: have a muffler shop install a proper exhaust line
3: Do not tap your fuel line for source fuel - use separate tank (Delica hates air bubbles, and heater may disagree with some Diesel Treatments or even the reducer T that you'd have to install).
4: Use V Power diesel fuel in your separate tank for higher cetane and better combustion
5: Run kerosene in heater once every 10 uses
6: If you get white smoke, prime the system by blowing air into the air intake during the white smoke cycles (make air inlet accessible, and see blower fan example in pictures)
7: Don't gravity feed the fuel from a roof mounted tank (floods the doser pump).
8: Only use the 4mm fuel line, do not substitute any other size.
9: The fuel line connections are critical, to prevent air lock, make sure ends are butted in the connection,
10: Throw out the cardboard air intake hose and upgrade yourself, I used 1/2" Sched 40 PVC going to a 22mm silicon hose.
Further resources:
https://www.letonkinoisvarnish.co.uk/eb ... tro_1.html
https://www.thesamba.com/vw/forum/viewt ... ?p=8585309
https://sites.google.com/site/whitemank ... us-heizung